Introduction
I’ve worked in industrial manufacturing for over a decade. One of the biggest production bottlenecks I’ve faced is achieving quality surface finishes without disrupting manufacturing speed. Aluminum polishing is one of those critical processes that’s simple in theory but challenging to master in practice. Today, I’ll share my experiences on how to polish aluminum effectively in manufacturing settings without slowing production.
Why Aluminum Polishing Matters in Manufacturing
Polishing aluminum isn’t just about aesthetics. It’s about functionality, quality assurance, and ultimately—profitability. When aluminum surfaces are correctly polished, products not only look better, they perform better, last longer, and meet stricter industry standards. This translates directly into happier customers, fewer returns, and improved brand reputation.
Common Use Cases: Casings, Housings, Frames, Aerospace & Automotive Components
Throughout my career, I’ve seen aluminum used extensively in various sectors, especially in automotive, aerospace, electronics, and consumer products manufacturing. Engine casings, electronic device housings, frames for automotive interiors, and aircraft components all demand high-quality aluminum finishes. For example, an automotive manufacturer I collaborated with needed mirror-like finishes on aluminum engine covers. Proper polishing techniques helped them achieve better corrosion resistance and heat dissipation.
Challenges in Production Settings: Speed, Consistency, Cleanliness
In high-paced production lines, the biggest challenge when learning how to polish aluminum is maintaining consistency and cleanliness without sacrificing speed. Any downtime or delays can significantly hurt overall productivity. I remember clearly one project where inconsistent polishing processes caused product defects, requiring costly reworks and delays. To avoid this, a streamlined polishing workflow and standardized techniques became essential.
Understanding Industrial-Grade Aluminum
To polish aluminum effectively, it’s important first to understand the materials you’re dealing with. Not all aluminum alloys behave the same way during polishing. This chapter details critical considerations based on my experiences with different industrial-grade aluminum types.
Common Aluminum Alloys Used in Manufacturing
Below is a quick reference table highlighting the most common aluminum alloys I’ve encountered in manufacturing settings and their characteristics, specifically regarding ease and results of polishing:
| Alloy Type | Common Applications | Polishing Difficulty | Typical Finish Achieved |
|---|---|---|---|
| 6061 | Structural components, automotive, aerospace | Moderate | High gloss, mirror-like |
| 7075 | Aerospace, high-strength structural parts | High | Semi-gloss to mirror |
| 5052 | Sheet metal fabrication, marine applications | Easy | Mirror-like finish |
| 2024 | Aircraft structures, precision machining | High | Semi-gloss |
| 3003 | General purpose, heat exchangers | Easy | Glossy, reflective |
| 1100 | Electrical and chemical applications | Easy | Highly reflective |
I’ve personally found that alloys like 6061 and 5052 deliver the best balance between strength and ease of polishing. Knowing this upfront helped us plan polishing steps more efficiently, preventing costly trial-and-error during production runs.
Pre-Coated vs. Raw Aluminum
When figuring out how to polish aluminum effectively in manufacturing, you’ll quickly discover there’s a big difference between raw and pre-coated aluminum. Raw aluminum typically requires more initial work due to its naturally oxidized surface. On the other hand, pre-coated aluminum may need specialized processes to avoid damaging its coating.
In one project involving electronic casings, we initially underestimated how much preparation pre-coated aluminum required. The coating necessitated careful handling to avoid scratching. Adjusting our polishing techniques significantly reduced rejects.
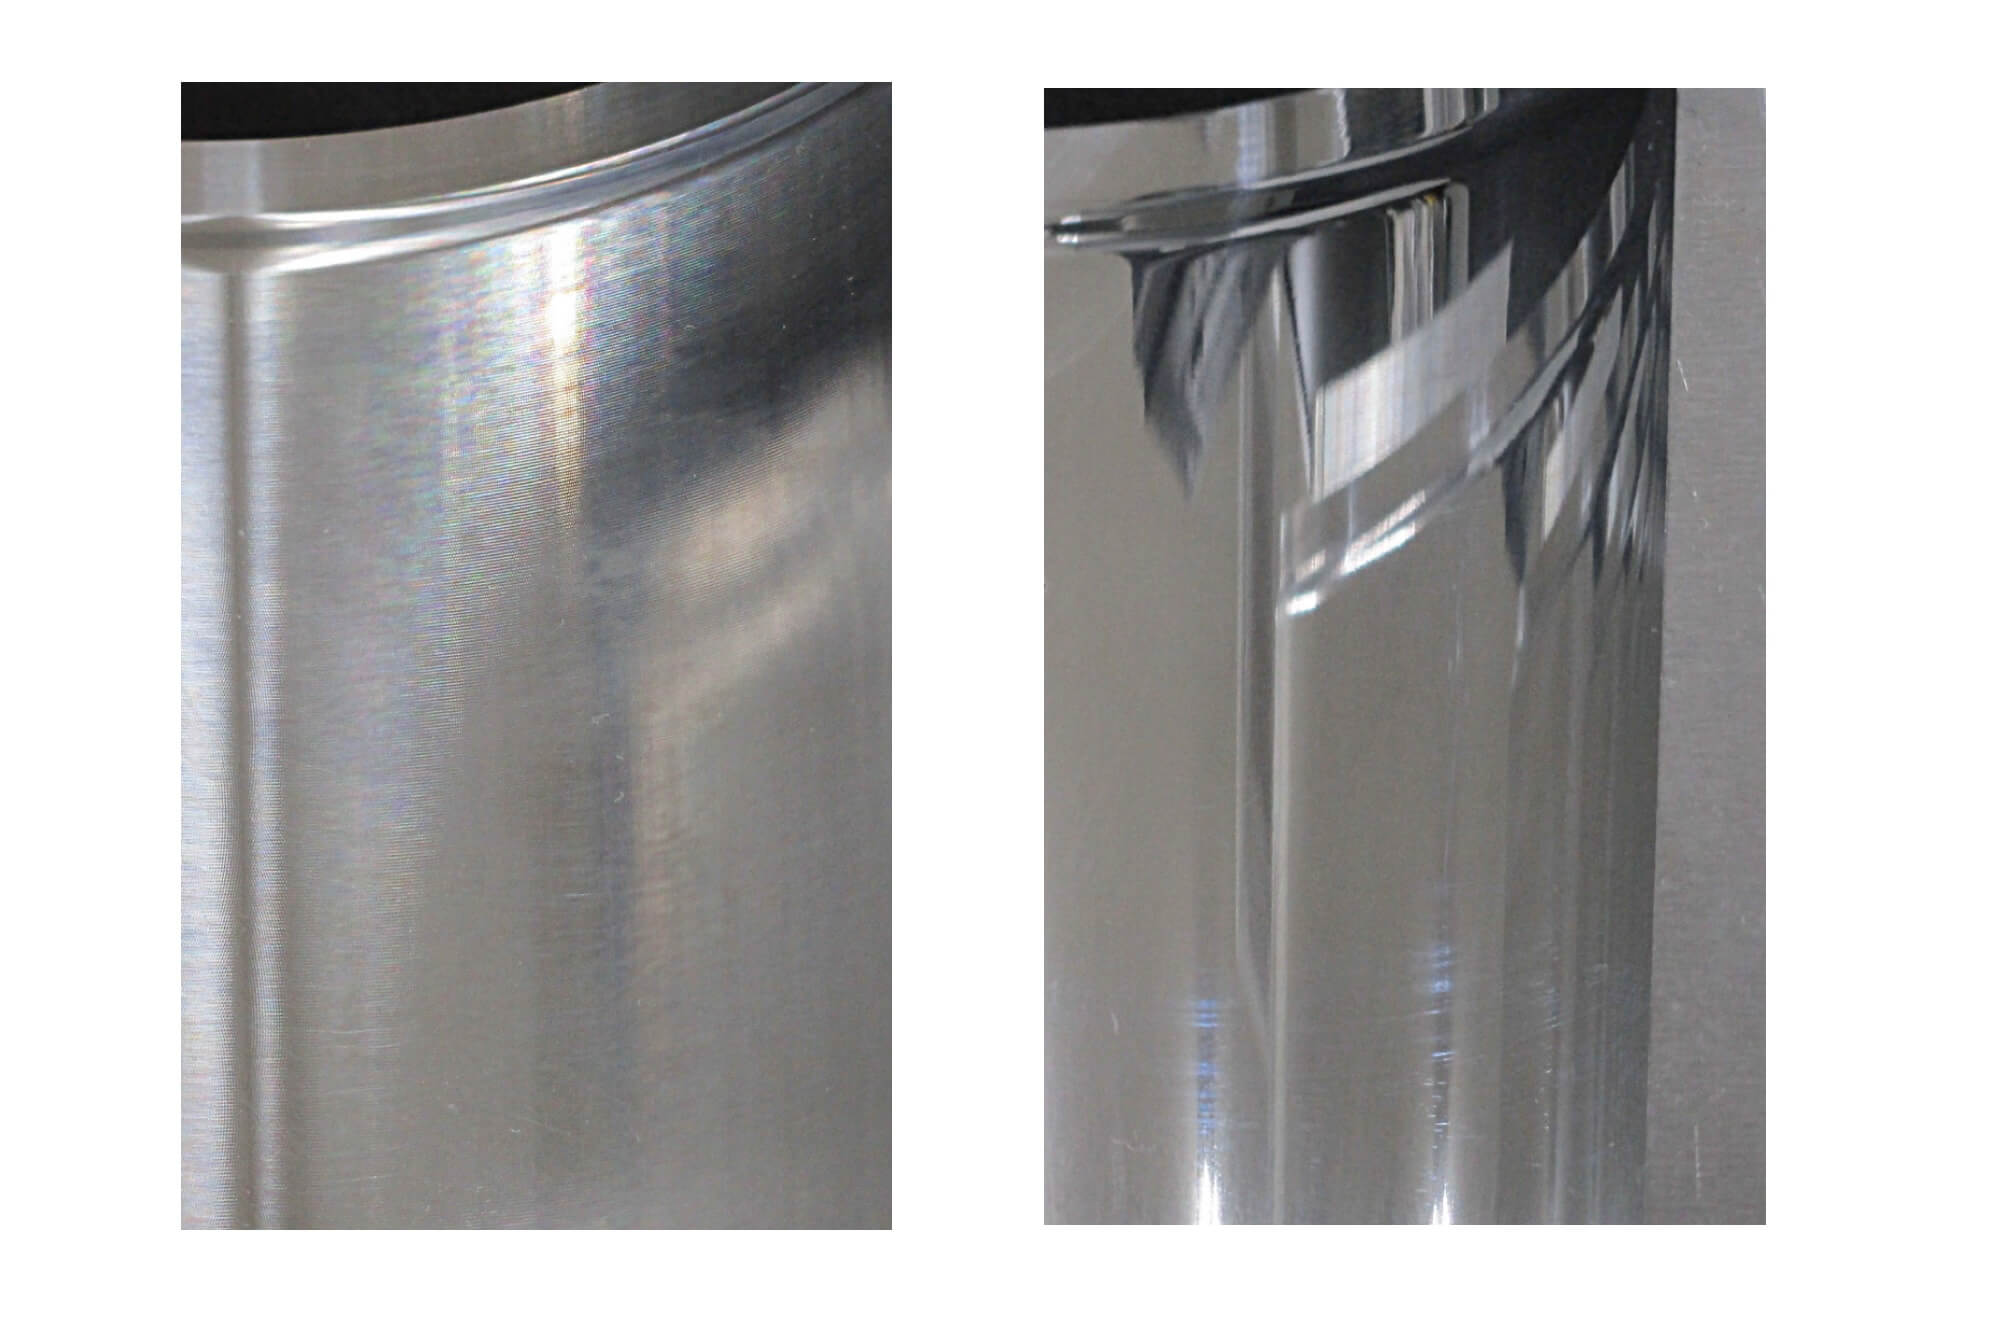
Surface Finish Standards in Industrial Specifications (Ra Value, Reflectivity)
In manufacturing environments, surface finishes aren’t subjective—they’re quantifiable. Industrial standards like Ra (Roughness Average) values and reflectivity percentages ensure consistency. Here’s a reference table I’ve often used in production:
| Finish Type | Ra Value (µm) | Reflectivity (%) | Typical Application |
|---|---|---|---|
| Industrial (standard) | 1.6 – 3.2 µm | 40% – 60% | Machinery, non-visible parts |
| Fine Industrial | 0.8 – 1.6 µm | 60% – 75% | Visible structural components |
| High Gloss Finish | 0.2 – 0.8 µm | 75% – 85% | Electronics casing, fixtures |
| Mirror (Ultra-Polished) | < 0.2 µm | > 85% | Aerospace, high-end automotive |
One aerospace client needed aluminum components polished to a mirror finish with Ra under 0.2 µm. This was challenging but achievable through meticulous pre-polishing steps and rigorous quality controls.
Tools and Materials for High-Efficiency Polishing
When it comes to figuring out how to polish aluminum parts in precision machining, one of the most overlooked but critical factors is tool selection. From my own experience running a small machine shop, choosing the right combination of polishing tools and materials can make or break your production flow.
High-Speed Buffing Machines: Bench vs. CNC-Integrated
In our shop, we use two main types of polishing systems:
- Bench Buffers – Ideal for low to medium volume jobs. We use them primarily for small components and custom parts.
- CNC-Integrated Polishing Heads – These are built into our 5-axis machines for post-machining polishing. It reduces part handling and saves cycle time.
Here’s a quick comparison table based on my team’s operational data:
| Machine Type | Use Case | Speed Control | Ideal Volume | Comments |
|---|---|---|---|---|
| Bench Polisher | Manual finishing, R&D | Manual | Low–Mid | Flexible but labor-intensive |
| Floor-Standing Buffing Unit | Medium parts, production line | Foot pedal | Mid–High | Great for repetitive tasks |
| CNC-Polishing Toolhead | Inline with machining process | G-code | High | Seamless, programmable finish |
| Robotic Polishing Arm | Complex parts, 24/7 automation | Auto-sync | Ultra-high | Best for lights-out operations |
I’ve found that integrating polishing into CNC programs can reduce cycle time by 12–20% for certain jobs, especially where surface finish tolerances are tight.
Abrasives and Polishing Compounds: What Works and What Doesn’t
When you’re learning how to polish aluminum in a precision environment, your abrasive selection needs to be intentional. We tested dozens of combinations over the years. Some failed miserably—others became our shop standard.
Here are the abrasive materials that consistently deliver:
- Sandpaper (wet/dry) – We use grits ranging from 400 to 2000, depending on surface requirements. Wet sanding is preferred for fine finishes.
- Scotch-Brite™ wheels – Useful for blending and deburring before polish.
- Tripoli compound – Our go-to for initial cut.
- White rouge – Excellent for bright finishing on 6061 and 5052 alloys.
| Compound Type | Grit Equiv. | Cut Speed | Finish Quality | Ideal Use Case |
|---|---|---|---|---|
| Brown Tripoli | ~600 | Fast | Medium | Pre-polish or post-sanding step |
| White Rouge | ~1200 | Medium | High | Bright finish for soft alloys |
| Blue Polishing Bar | ~2000 | Slow | Very High | Final mirror finish |
| Green Stainless Bar | ~800 | Moderate | Medium-High | Not ideal for aluminum |
My advice? Always test your compound on a scrap part first. I’ve ruined entire batches of prototype casings using the wrong compound just because I skipped this step.
Manual vs. Automated: Finding the Right Balance
I’ve found that manual polishing still plays an important role in small-batch and high-detail jobs. But anything over 100 parts, and you’re asking for repetitive strain injuries and inconsistent results.
That’s where automation shines—literally. One of our most successful upgrades was a $12,000 polishing robot that handled valve bodies. It tripled throughput with a consistent 0.4µm Ra finish.
Streamlined Polishing Workflows
When we talk about how to polish aluminum in a precision machining shop, efficiency is everything. You don’t have the luxury of trial and error when you’re running multiple machines and trying to meet tight delivery windows. In my shop, we had to learn the hard way: either streamline the polishing process, or watch it become the bottleneck that chokes your production line.
Pre-Processing: Deburring, Degreasing, and Surface Prep
Before any polishing begins, I always make sure every aluminum part is properly prepped. No exceptions.
Here’s what we typically include in the pre-polish checklist:
- Visual Inspection – Check for tool marks, burrs, or coolant residue.
- Deburring – We use a mix of tumbling and manual edge-breaking, especially on milled edges.
- Degreasing – Any leftover oil can ruin a polish. We use an ultrasonic cleaner with a mild alkaline solution.
- Surface Prep – For parts requiring sub-1.0µm Ra finishes, we usually wet sand with 800–1500 grit before polishing.
Skipping any of these steps usually leads to wasted compound, burned pads, and worse—a flawed finish that you’ll have to sand down and do over.
Polishing Techniques That Fit Inline or Batch Production
In batch production, you can afford to set up dedicated polishing stations. For inline, the challenge is tighter.
We use two approaches:
1. Standalone Batch Cells
This is ideal for polishing high-volume parts offline while machines run other jobs.
Typical workflow:
- Operator collects finished parts → loads onto polishing fixture
- Step 1: Scotch-Brite blend
- Step 2: Tripoli cut (mounted wheel)
- Step 3: White rouge final pass (buffing wheel)
- Step 4: Alcohol wipe and QC inspection
This keeps our machine spindles focused on cutting while a second operator handles finishing.
2. Inline with CNC (Post-Machining Polish)
On our 5-axis Mazak machines, we’ve added polishing steps directly in the G-code. After final contouring, the spindle automatically slows to 1800 RPM, swaps to a polishing tool, and applies compound via mist coolant.
This reduced our post-processing time by 18% on a critical aerospace bracket project, and helped us win a long-term supply contract due to surface finish consistency.
Reducing Downtime: Jigs, Fixtures, and Multi-Part Rigs
The best thing we ever did was build custom multi-part polishing rigs. These let us polish 6–12 parts at a time with minimal setup.
We engineered aluminum holders with felt-lined clamps that could fit a standard 12″ buffing wheel. One operator could polish a dozen valve covers without resetting each piece. This improved throughput by 35%.
Table: Sample Time Comparison Before vs. After Multi-Part Fixtures
| Process Stage | Before Fixture (sec/part) | After Fixture (sec/part) | Improvement |
|---|---|---|---|
| Load/Clamp | 22 | 5 | 77% faster |
| First Cut Pass | 60 | 20 | 67% faster |
| Final Buff | 45 | 18 | 60% faster |
| Total Time Per Part | 127 | 43 | 66% faster |
These kinds of modifications don’t require six-figure robotics. They just require a bit of creativity and attention to where time is wasted.
Polishing Before Anodizing or Coating
Polishing doesn’t always mean final finish. In many precision machining jobs, the polish is a prep step before:
- Anodizing – Polished aluminum anodizes with deeper color uniformity
- Powder Coating – A smooth polished base leads to better adhesion and even coverage
- Chemical Conversion Coating (e.g., Alodine) – Pre-polished parts improve resistance consistency
We use 6061-T6 for most anodized parts. If we skip polishing, we get patchy dark spots in red or black anodized batches. When we prep with fine-grit sanding and Tripoli polish first, the end color is rich and even.
Process Optimization Without Slowing Down Production
When I first began learning how to polish aluminum in a CNC shop environment, my biggest concern wasn’t technique—it was time. In a precision machining workflow, every extra second per part adds up. We had to figure out how to deliver mirror-like finishes without throwing off our takt times or pulling machines off priority work.
Here’s how we made polishing an asset—not a bottleneck.
Takt Time Considerations for Polishing
Takt time is the rhythm of your production. In our shop, we use it to coordinate everything: from when a billet is mounted on the CNC to when a part hits inspection.
Let’s say your takt time is 90 seconds per part. If polishing takes 2 minutes per unit, you’re instantly out of sync. So we had to align our polishing cycle time with machining output.
We broke this down using a simple chart like the one below:
| Part Type | Machining Takt Time | Polishing Time Target | Actual After Optimization | Balanced? |
|---|---|---|---|---|
| Sensor Housing | 85 sec | ≤ 80 sec | 76 sec | ✅ |
| Valve Cap | 120 sec | ≤ 110 sec | 108 sec | ✅ |
| Heat Sink | 65 sec | ≤ 65 sec | 72 sec → adjusted | ❌ |
| Pump Cover | 100 sec | ≤ 90 sec | 87 sec | ✅ |
For parts like the heat sink, we eventually introduced a dual-station polishing cell to keep up.
Parallel Processing and Workstation Handoff
We implemented a parallel flow model for polishing. Instead of sending one part through the entire process start to finish, we staggered workstations like this:
- Station 1: Initial cut polish (Tripoli)
- Station 2: Final buff (Rouge)
- Station 3: QC + surface sealant
Each operator could stay focused on one task, reducing mental switching and improving quality. In our most successful case, we improved output on pump housings by 42% just by segmenting the process.
Minimizing Operator Intervention
The fewer decisions an operator has to make, the better. I try to remove judgment calls by implementing:
- Torque-limiting arms on polishing wheels
- Preset compound dispensers
- Visual work instructions laminated on each workstation
- Light trees to indicate station status
For instance, our new hires now get fully up to speed on polishing aluminum parts in under 3 days—with less than 2% rework rate—because they follow a tightly scripted, visually guided workflow.
Maintenance and Changeover Efficiency
Most shops overlook this, but polishing equipment needs just as much lean thinking as CNC machines. Every time we ignored compound buildup or let buffing wheels wear unevenly, our finish quality dropped—and our scrap rate soared.
We now follow this weekly maintenance checklist:
| Task | Frequency | Responsible | Time Needed |
|---|---|---|---|
| Clean compound dispensers | Weekly | Operator A | 10 min |
| Replace worn buff wheels | Bi-weekly | Technician | 15 min |
| Check alignment of rigs | Weekly | Team Lead | 5 min |
| Inspect torque arms | Monthly | Maintenance | 30 min |
| Polish station audit | Weekly | Supervisor | 20 min |
This minor time investment reduced finish failures by 60% over a 3-month stretch.
Case Studies from Real Manufacturing Lines
I’ve seen firsthand how transforming the way you polish aluminum can ripple through an entire production line—sometimes in ways you wouldn’t expect. In this chapter, I’ll share two real cases: one from an aerospace supplier we supported, and another from a consumer electronics manufacturer I worked with during a consulting engagement.
These stories aren’t theory—they’re how we actually implemented aluminum polishing strategies on the shop floor and improved both quality and throughput.
Case Study 1: Aerospace Component Polishing Line
Client Type: Tier-2 supplier for commercial aircraft interiors
Part: Aluminum seat frame brackets (6061-T6)
Finish Requirement: Mirror polish (Ra < 0.2 µm) before anodizing
Problem: Surface inconsistencies and scratches were causing 18% rejections after anodizing
Target: Reduce rejection rate to < 5% without increasing production time
The Fix
Initially, they were hand-buffing each bracket post-machining—slow, inconsistent, and very operator-dependent. We helped them switch to a 3-stage process using automated polishing arms and standard compound dosing.
New Workflow:
- Inline Deburring Station
→ Vibratory finishing, 10 minutes batch - Automated Polishing Cell
→ Tripoli wheel, white rouge, microfiber buff (all robot-guided) - Ultrasonic Clean & Dry
→ Critical before anodizing to eliminate oils and residues
The Result
Within two months, their finish-related rejection rate dropped from 18% to 3.1%. Even better, polishing time per part went from 6 minutes (manual) to 2.5 minutes (automated).
| Metric | Before | After Optimization | Change |
|---|---|---|---|
| Rejection Rate | 18% | 3.1% | -83% |
| Avg. Polish Time Per Part | 6 min | 2.5 min | -58% |
| Anodizing Quality Yield | 82% | 96.9% | +18.4% |
| Operator Dependency | High | Low | — |
One of their supervisors even told me:
“This is the first time polishing wasn’t a wildcard in production.”
Case Study 2: Consumer Electronics Housing
Client Type: Contract manufacturer for a premium headphone brand
Part: CNC-machined aluminum ear cup housing (7075)
Finish Requirement: Brushed + glossy logo area
Problem: Manual polishing steps were unscalable for upcoming product ramp
Target: Triple throughput without sacrificing finish quality
The Fix
Their existing setup relied heavily on skilled hand polishers to achieve the delicate brushed-to-gloss transition. We proposed a hybrid approach using CNC + semi-automated polish rigs.
Steps Implemented:
- CNC-programmed brushing pass using Scotch-Brite pad at 3000 RPM
- Custom logo jig to isolate high-gloss zone during buffing
- Low-friction bearing rig for high-speed rotational buff
- QC light tunnel station to inspect reflectivity angles
The Result
This allowed them to scale from 200 units/day to over 700 units/day within 3 weeks.
| Metric | Before | After | Change |
|---|---|---|---|
| Daily Output | 200 parts/day | 710 parts/day | +255% |
| Gloss Zone Defect Rate | 6.4% | 1.2% | -81% |
| Labor Hours per 1000 Units | 42 | 18 | -57% |
| Consistency Across Batches | Low | High | — |
They kept the tactile, high-end look they wanted, but made it production-ready. I still use this project as an example when talking to clients about how to polish aluminum in mixed-surface-finish products.
In both these cases, standardizing workflow, introducing automation where possible, and treating polishing like a core production function (instead of an afterthought) made the biggest difference.
Common Issues in Industrial Polishing and How to Avoid Them
Even after years of figuring out how to polish aluminum in a production environment, I still see the same problems come up again and again. Some of these issues are small but persistent, and others can cause major disruptions—like scrapping a high-value part at the very last step.
This chapter breaks down the most common issues I’ve encountered and the solutions we’ve implemented that actually work in the real world.
1. Overheating and Surface Warping
Problem: During extended polishing, especially with aggressive compounds or high RPMs, heat builds up and causes surface distortion. It’s more common than you’d think—especially with thin-walled parts.
Fix:
- Use pulsed polishing (5 seconds on, 3 seconds off)
- Apply light, consistent pressure
- Use cooling mist or fan-assisted polishers
- Always avoid dry buffing unless explicitly needed for final shine
In one case, a polished 2mm-thick aluminum phone bezel warped slightly due to friction heat. We now mandate polishing temperature checks for all cosmetic parts.
2. Inconsistent Shine or Patchy Reflectivity
Problem: Uneven polishing pressure, poor compound distribution, or skipping grit stages can all result in patchy or dull areas, especially under bright lighting or after anodizing.
Fix:
- Follow strict grit progression (e.g., 600 → 800 → 1200)
- Pre-soak buffs in compound for even spread
- Avoid cross-contaminating wheels between compound types
- Use consistent stroke paths—either linear or orbital
We added zone-specific light booths to our final QC area, which helped us spot reflectivity inconsistencies early.
3. Aluminum Turning Black During Polishing
Problem: This is one of the most common issues when learning how to polish aluminum. It happens when the aluminum oxide layer reacts with the compound, or when too much pressure and heat are applied.
Fix:
- Switch to white rouge or blue polishing bars
- Use cleaner compounds with fewer petrochemical binders
- Wipe with isopropyl alcohol between stages
- Replace buffing wheels more frequently
I used to think the black marks were “just part of the process.” They’re not. They’re a red flag.
4. Compound Buildup and Residue
Problem: Excess polishing compound can clog fine features, threads, or logo engravings. It hardens and becomes nearly impossible to clean after curing.
Fix:
- Use minimal compound and replenish gradually
- Polish at lower RPMs when working around fine features
- Clean immediately with compressed air and alcohol
- For batch cleaning, we use an ultrasonic bath with mild detergent
We ruined an entire tray of 7075 logo plates this way once. After that, we started using silicone masking inserts to protect engravings during polish.
5. Buffing Wheel Marks or “Swirl Ghosting”
Problem: Circular marks or “swirls” appear under angled light, especially on flat parts.
Fix:
- Use a final polish with microfiber or cotton pads
- Switch to orbital polishers for large surfaces
- Apply polish in opposing directions between passes (horizontal vs vertical)
For our aerospace clients, we inspect under 45° light angles. Swirl marks are considered cosmetic defects for polished faceplates and visible fasteners.
6. Tool Vibration Causing Ripple Patterns
Problem: Low-quality machines or poorly balanced buffing wheels cause ripple-like distortions across polished surfaces.
Fix:
- Balance all buffing wheels weekly
- Replace worn bushings in polishing arms
- Use anti-vibration mounts or polish stands
After we swapped to vibration-damped arbor motors, our surface finish quality stabilized significantly, especially on thin plate components.
7. Operator Fatigue Leading to Inconsistencies
Problem: Repetitive polishing tasks over long shifts lead to mistakes—too much pressure, skipped stages, or inconsistent angles.
Fix:
- Rotate polishing operators every 2 hours
- Use foot pedal speed controls to reduce strain
- Train all operators on “light pressure” polishing methods
We also track part finish data by operator, not just shift, which gives us better insight into training needs and performance balance.
Equipment and Supplier Recommendations
When you’re working in a production environment, the quality of your finish often comes down to the tools you use. Over the years, I’ve tested dozens of machines, compounds, and setups to refine how to polish aluminum efficiently. Some tools I’d never buy again. Others became essential parts of our workflow.
Below are my personal, battle-tested recommendations for polishing aluminum in precision machining environments—broken down by category and application type.
Polishing Machines: Bench, Standalone, and Inline
| Machine Type | Recommended Model | Price Range | Best For | Why I Recommend It |
|---|---|---|---|---|
| Bench Buffer | Baldor 333B 1/3HP | $400–600 | Low-volume or prototype polishing | Smooth motor, reliable torque control |
| Floor-Standing Polisher | JET J-41002 Belt & Disc Combo | $800–1,200 | General-purpose shop work | Great for edge blending + flat polish |
| CNC Polishing Toolholder | Techniks BT30/BT40 Buff Arbor | $150–300 | Inline CNC integration | Lightweight, balances well at high RPM |
| Robotic Polishing Arm | Fanuc CRX with End-Effector Kit | $25K+ | 24/7 unmanned finishing lines | Ideal for batch consistency, long runs |
I’ve personally used the Baldor 333B in both job shops and production cells. It’s compact, safe, and lasts forever with proper maintenance.
Abrasives and Polishing Compounds
| Product Type | Brand/Item Name | Grit/Type | Use Stage | Notes |
|---|---|---|---|---|
| Abrasive Belt | 3M Cubitron II | 400–1200 grit | Pre-polish sanding | Cuts cool, lasts longer than ceramic |
| Compound – Cut | Menzerna 439T (Tripoli type) | ~600 grit equiv. | First pass | Heavy cut, fast oxide removal |
| Compound – Gloss | Menzerna P175 Super Finish | ~2000+ grit | Final pass | For mirror-like clarity on 6061/5052 |
| Buffing Wheel | Osborn Spiral Sewn Cotton Wheel | 6–10″ diameter | All-purpose use | Good compound retention, minimal fray |
| Sealer/Protectant | Flitz Sealant Spray | — | Post-polish finish | Extends shine, adds corrosion resistance |
If you’re looking for great cut and clarity without blackening, Menzerna has never let me down. It’s pricey, but worth it if you’re polishing aluminum for premium parts.
Fixtures, Add-Ons, and Workspace Tools
| Item Type | Recommendation | Function | Pro Tip |
|---|---|---|---|
| Part Fixture Rigs | Custom-built aluminum jigs | Secure multiple parts simultaneously | Use felt or silicone-lined clamps |
| Compound Dispensers | Gravity-feed squeeze bottles | Minimize waste, ensure even coverage | Keep separate bottles per compound type |
| Dust Collection System | Shop Fox W1727 Portable Collector | Capture airborne aluminum particles | Position close to wheel face |
| Light Booth | DIY LED tunnel with reflectors | Inspect micro-finish & reflectivity | Angle lighting at 45° for full spectrum |
| Operator Aids | Foot-pedal speed control kit | Reduce fatigue, improve RPM control | Combine with cushioned floor mats |
One small upgrade that made a huge difference was switching to foot-pedal polish control. It gave our operators better control and reduced burn-through incidents by at least 40%.
Sourcing Suggestions (USA-Based)
If you’re sourcing in the U.S., I’ve had good luck with:
- MSC Industrial (www.mscdirect.com) – Great for industrial-grade polishing compounds and abrasives
- McMaster-Carr (www.mcmaster.com) – For jigs, clamps, and light duty tools
- Eastwood (www.eastwood.com) – Budget-friendly options for entry-level polishing kits
- Gesswein (www.gesswein.com) – High-end polishing tools, used heavily in mold making and aerospace finishing
For overseas or volume-based orders, we also work with a vendor out of Taiwan who supplies bulk polishing wheels at 30–40% less cost. Feel free to ask if you want that contact.
Conclusion & Key Takeaways
After years of working in precision machining, I’ve learned one thing about how to polish aluminum: it’s not just a cosmetic detail—it’s a performance metric. Whether the goal is functionality, compliance, or aesthetics, polishing is a critical production step that deserves just as much engineering as milling or turning.
Here’s a quick recap of the most important takeaways from this guide:
✅ Key Takeaways
- Understand Your Alloy: Different aluminum grades respond differently to polishing. Know what you’re working with.
- Surface Prep is Non-Negotiable: Degrease, deburr, and sand before any compound touches the part.
- Choose the Right Tools: Match your machine, wheel, and compound to your volume and finish needs.
- Inline = Efficiency: Where possible, embed polishing into your CNC process to reduce handling and time loss.
- Workflow Over Intuition: Follow structured steps, grit progressions, and quality checks to reduce rework.
- Automation Pays Off: For high-volume parts, automated polishing reduces labor cost and increases finish consistency.
- Avoid Common Pitfalls: Learn to spot and prevent heat distortion, compound residue, swirl marks, and oxidation.
If you’re just beginning to build out a polishing workflow in your machine shop, start small—one part, one jig, one buffer. From there, scale strategically. What matters most is that polishing becomes part of your repeatable production logic, not a last-minute aesthetic patch.
✅ Checklist: Building a Professional Aluminum Polishing Workflow
| Step | Completed? |
|---|---|
| Identify aluminum alloy type | ☐ |
| Define surface finish spec (Ra/visual) | ☐ |
| Prep with degreasing and deburring | ☐ |
| Select proper abrasives and compound | ☐ |
| Match tool type to production scale | ☐ |
| Integrate QC checkpoints in-line | ☐ |
| Monitor operator technique and fatigue | ☐ |
| Document process for repeatability | ☐ |
| Implement maintenance schedule | ☐ |
| Review surface results with inspection | ☐ |
FAQ
1. What is the best compound to polish aluminum in machining shops?
White rouge and Menzerna P175 work best for final shine. Use Tripoli or 439T for first-stage cuts.
2. Why does aluminum turn black during polishing?
Excessive heat, oxidation, and dirty compounds can cause dark smearing. Use less pressure and clean between stages.
3. Can I polish aluminum directly on the CNC?
Yes, with proper tooling and G-code integration. Use buffing arbors and reduce spindle speeds for safe polishing.
4. How do I avoid swirl marks on flat aluminum parts?
Use orbital polishers, alternate polishing directions, and finish with microfiber instead of sewn cotton buffs.
5. Do I need to polish before anodizing aluminum?
Yes. A smooth polish improves color depth and consistency. Otherwise, you’ll get patchy or blotchy finishes.
6. What RPM is ideal for polishing aluminum?
Anywhere from 1800–3600 RPM, depending on part size and compound type. Too high causes burns and swirl.
7. Should I wet sand or dry sand before polishing?
Wet sanding reduces heat and improves clarity. Use 800–1500 grit depending on the finish required.
8. Can I automate the entire aluminum polishing process?
Absolutely. Robotic polishing is ideal for batch production. Just be sure to control pressure and compound flow.
9. What’s the fastest way to polish aluminum without losing quality?
Use jigs, dual-pass compounds, and rotate operators. Avoid shortcuts like skipping grit stages.
10. How do I polish engraved or logo areas without ruining detail?
Use masking inserts or small polishing tips. Avoid excess compound and polish by hand if needed.
11. What PPE should be used during polishing?
Eye protection, gloves, respirators (especially around fine aluminum dust), and ear protection in noisy shops.
12. What Ra value equals a “mirror finish”?
Typically < 0.2 µm. Use surface profilometers to measure post-polish and validate.
13. Can I reuse polishing wheels with different compounds?
Not recommended. Contamination ruins finish quality. Use dedicated wheels per compound.
14. How long does a polished finish last?
Depends on environment. Indoors with sealant = years. Outdoors = months unless re-polished or coated.
15. How do I maintain polish quality over time?
Seal with wax or Flitz, clean regularly, and handle with gloves to avoid oils.
References & Further Reading
For readers who want to deepen their understanding of aluminum polishing techniques, material properties, and surface finishing standards, the following trusted resources offer authoritative insights:
- Wikipedia – Polishing (Metalworking)
General overview of the polishing process including abrasives, equipment, and surface finish goals.
https://en.wikipedia.org/wiki/Polishing_(metalworking) - Wikipedia – Aluminium Alloy
Detailed description of various aluminum alloys and their industrial applications. Useful for understanding polishability differences.
https://en.wikipedia.org/wiki/Aluminium_alloy - MakeItFrom.com – Material Properties of 6061-T6 Aluminum
A reliable technical reference that details physical and mechanical properties of aluminum grades commonly polished in machining shops.
https://www.makeitfrom.com/material-properties/6061-T6-Aluminum/
Other Articles You Might Enjoy
- The Art of Burnished Bronze: Exploring Machining and Polishing Methods
Introduction Burnished bronze has been a material of fascination for many over the centuries. Whether you’re an artist crafting a masterpiece or an engineer designing industrial components, burnished bronze offers…
- The Art of Burnished Bronze: Exploring Machining and Polishing Methods
Introduction Burnished bronze has been a material of fascination for many over the centuries. Whether you’re an artist crafting a masterpiece or an engineer designing industrial components, burnished bronze offers…
- How to Work with Chrome Metal in Machining: A Practical Guide
Chapter 1: What Is Chrome Metal? Before diving into CNC machining details, let’s clear up one thing: what exactly is chrome metal? Many people confuse chrome metal with pure chromium. Chrome…
- Thinking of Using Satin Anodized Aluminum for CNC Parts
What Exactly Is Satin Anodized Aluminum, and Why Might You Choose It? I’ve worked with aluminum in a lot of projects—some industrial, some purely cosmetic. Over time, I’ve come to…
- Clear Anodized Aluminum Explained: Material Benefits, Use Cases and Buying Tips
Introduction When I first came across clear anodized aluminum, I was designing a custom electronics enclosure for a client in the industrial automation field. They wanted something lightweight, durable, and…
- Powder Coating Cost Calculator Guide: Estimating Jobs by Size, Shape, and Volume
Introduction: Why Accurate Powder Coating Cost Estimation Matters When I first started exploring powder coating as an option for metal finishing, I underestimated how important accurate cost estimation really was.…
- How to Powder Coat: A Professional Machinist’s Guide to Perfect Results
Chapter 1: Why Machinists Need to Learn Powder Coating Powder coating is a robust, eco-friendly finishing method that I’ve seen more and more machinists adopt.When people look up “how to…
- Ceramic Coating and Machining: Unlocking Advanced Manufacturing Applications
Introduction I’ve been fascinated by the way ceramic coating can radically transform the performance of machined parts. Ceramic coating, as a concept, goes well beyond the automotive finishes many of…
- Glass Bead Blasting Material and Its Impact on CNC Machining Performance
In the world of CNC machining, precision, quality, and surface finish are critical factors, especially for industries that demand high-performance components. Among the various surface finishing techniques used to improve…