Introduction
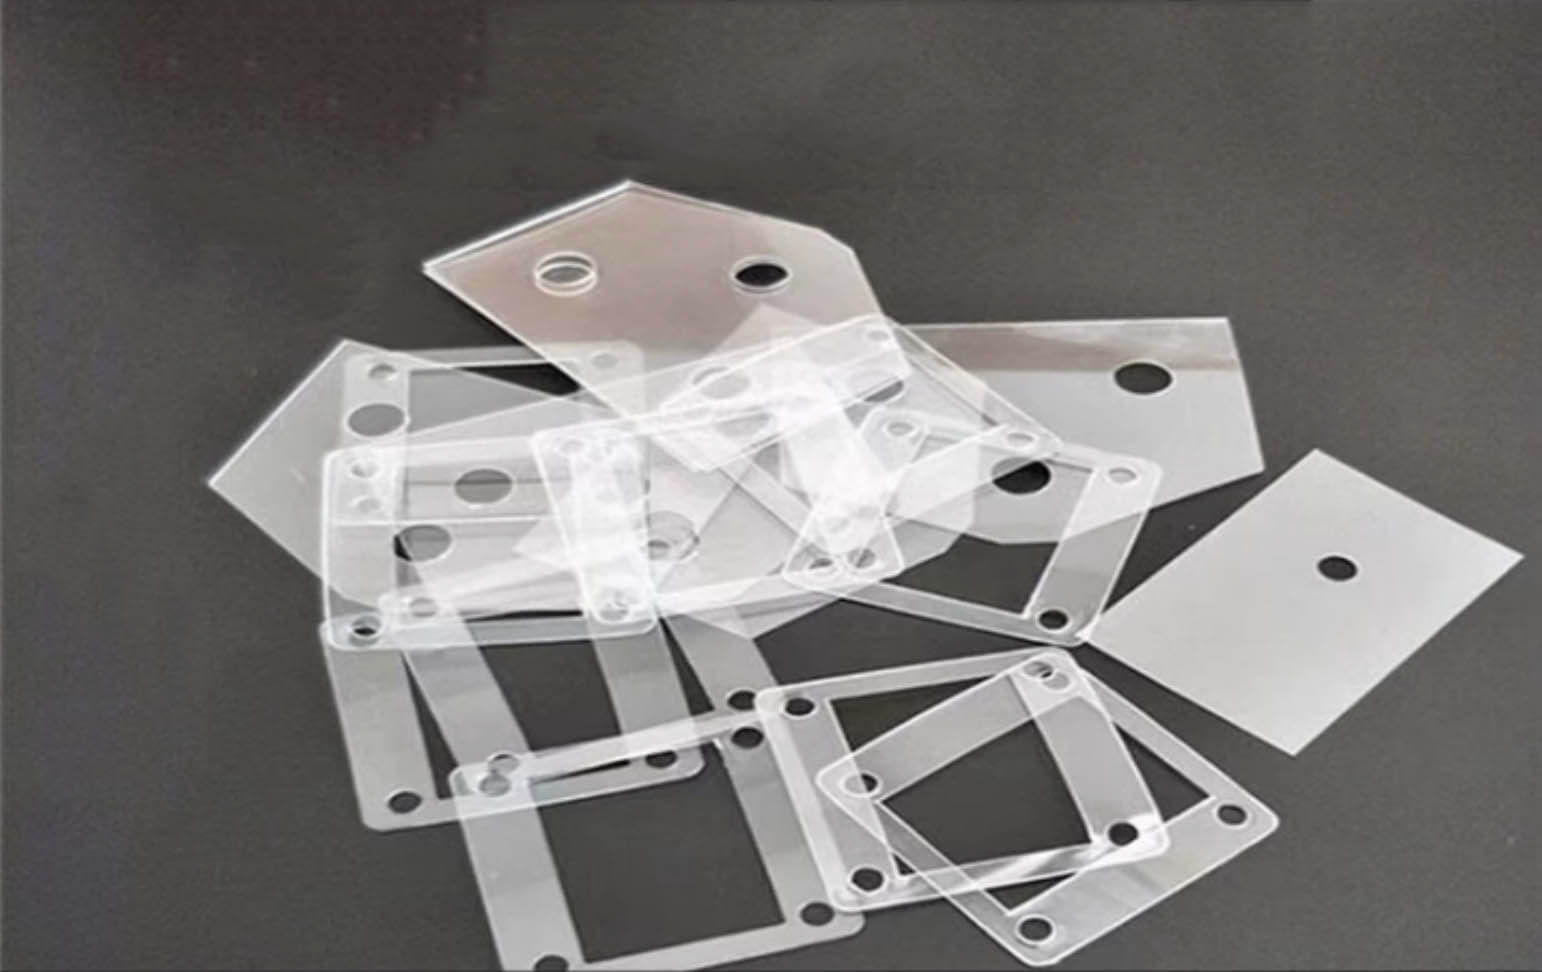
Plastic shims are one of those components you don’t think much about—until you really need them. I first got into making custom plastic shims when I was building a small fixture that needed perfect spacing between two aluminum plates. Off-the-shelf metal shims were either too thick or too rigid, and cutting plastic by hand was inconsistent. So, I turned to CNC.
Using CNC machines to produce plastic shims offers a level of precision and flexibility that traditional stamping or die-cutting just can’t match—especially when it comes to low-volume or one-off parts. Whether you’re in aerospace, automotive, medical devices, or just building robots in your garage like I do, chances are you’ve run into a moment where you need a shim that’s just not available anywhere. That’s where CNC machining comes in.
In this guide, I’ll walk through everything I’ve learned about how to make plastic shims using CNC machines. I’ll cover material selection, CAD and design tips, machine setup, tooling, tolerances, surface finish, and how to produce shims at scale. This isn’t theory—this is based on what’s actually worked for me in a real shop environment. If you’ve got a CNC router or mill and want to make precise, clean, and repeatable plastic shims, this article is for you.
Common Use Cases for CNC-Cut Plastic Shims
When I first started making custom plastic shims, I quickly realized how versatile they can be in different industries. They aren’t just for one specific use—there are countless applications where precision is crucial, and CNC-cut plastic shims can offer the perfect solution. Let me walk you through a few scenarios where plastic shims have become indispensable.
When Standard Shim Kits Don’t Fit the Job
Not all gaps are the same, and that’s where the standard shim kits fall short. In some cases, the gap you need to fill might be an odd size or shape that no pre-made shim can accommodate. I’ve used CNC machines to create shims with specific dimensions, such as irregular holes or cutouts, that are necessary for custom parts or fixtures.
Take, for example, a project I worked on where I had to align two irregularly shaped surfaces. The only way to get an accurate fit was by designing the shim to match the unique geometry. CNC cutting gave me the precision I needed to create custom shims that fit perfectly, which would have been impossible with pre-made kits.
Industries That Require Custom Shims
Plastic shims made with CNC machines are used across various industries, each with unique needs for precision, durability, and customization. Here are some industries where I’ve seen great results using CNC-cut plastic shims:
Aerospace
In aerospace, precision is non-negotiable. Plastic shims are used in the assembly of various components such as aircraft frames, engine parts, and control systems. The material needs to be lightweight yet strong enough to withstand high pressures and extreme temperatures. CNC-machined plastic shims are often used in these scenarios to fine-tune assembly tolerances and maintain structural integrity.
Automotive
When it comes to automotive manufacturing, especially in high-performance vehicles, plastic shims are used to adjust part alignment or control gap tolerances. I worked on a project where we had to ensure the perfect alignment of engine components, and the precision of CNC-cut plastic shims made all the difference. They are also used in suspension systems, brake assemblies, and housing components where precise spacing is required.
Medical Devices
In the medical device industry, plastic shims are often used to create custom spacers and alignment components for machinery or devices like MRI machines, surgical robots, and more. These shims need to meet strict regulatory standards, which is why the precision provided by CNC machines is so valuable. When I worked on a project that involved creating custom shims for a medical device prototype, CNC machining allowed us to fine-tune the design for perfect fitment without compromising on quality.
Robotics
Robots have become increasingly complex, and many parts require precise assembly. I’ve used CNC-cut plastic shims to adjust the spacing between sensors, arms, and other robotic components. These shims are especially useful when dealing with tight tolerances in robotic joints or frames where manual adjustments would be too time-consuming and error-prone.
Benefits of On-Demand Shim Production: Low MOQ and Fast Iteration
One of the major advantages of using CNC for shim production is the ability to produce parts on demand. If you’ve ever had to wait weeks for a part to arrive or for a custom batch to be manufactured, you know how frustrating it can be. With CNC machining, you can make shims as needed, reducing inventory costs and lead times.
For example, if you need a quick prototype to test a new design, CNC cutting allows you to go from CAD to physical part in just hours, instead of days or weeks. I’ve used this to my advantage when working with tight deadlines or adjusting designs on the fly.
Case Examples: Real-World Applications of CNC-Cut Plastic Shims
Let me give you a few real-world examples of when I’ve used CNC-machined plastic shims to solve unique problems:
- Case 1: Precision Tooling in Automotive
During a vehicle engine assembly, the team needed to adjust the position of a few critical components. By CNC machining custom shims, we were able to adjust the height of certain parts by mere millimeters, preventing misalignment that would have led to assembly issues down the line. - Case 2: Fine-Tuning Aerospace Components
While assembling components for a drone, I used CNC-machined plastic shims to fine-tune the gap between key mechanical parts. The material was chosen for its lightweight yet durable nature, ensuring optimal functionality under varying conditions. - Case 3: Medical Device Prototype
I once worked with a team designing a surgical robot. We used CNC-cut plastic shims to precisely position sensors and motors, making sure each component was aligned perfectly for operation.
As you can see, plastic shims have broad applications across industries that demand high precision and customization. CNC machining gives you the ability to produce shims that are tailored to specific needs—whether it’s for prototyping, small-batch production, or modifying existing designs.
Material Selection for CNC-Machined Plastic Shims
Choosing the right material for your plastic shims is crucial. I’ve learned the hard way that not all plastics behave the same under the cutting tool. Selecting the appropriate material can significantly impact how well your shim functions and how easily it can be machined. Let’s break down some common materials and discuss their properties, CNC machinability, and typical applications.
Common Plastic Materials for CNC Shims
Over the years, I’ve experimented with many different plastics for CNC shim production. Here’s a quick rundown of the most common options, along with their strengths and typical applications:
Nylon (Polyamide)
Nylon is often my first choice for general-purpose shims. It’s strong, resilient, and easy to machine. It resists abrasion, moisture, and chemicals fairly well.
PTFE (Teflon)
PTFE is excellent for applications needing high chemical resistance and extremely low friction. It’s more expensive but worth it for certain precision projects.
PVC
PVC is affordable and easy to machine. However, it doesn’t handle heat or chemical exposure very well. It’s useful for electrical insulation and general indoor applications.
HDPE (High-Density Polyethylene)
HDPE machines easily and offers good moisture resistance and durability. It’s ideal for outdoor uses or where chemicals might be present.
UHMW (Ultra-High Molecular Weight Polyethylene)
This material offers superior abrasion resistance and is great in applications involving sliding or friction surfaces. Machining UHMW can be tricky because of its gummy nature, but it’s worth it for durability.
Acetal (Delrin)
Acetal has great dimensional stability and rigidity. It’s excellent for precise tolerances, making it my choice for structural shims and components that must hold tight dimensions.
Polycarbonate
Polycarbonate offers high impact resistance and rigidity. While slightly harder to machine cleanly, it’s great for transparent or impact-resistant applications.
Mechanical, Thermal, and Chemical Properties
When selecting a plastic for shims, understanding mechanical strength, thermal stability, and chemical resistance is key. Here’s a quick reference table I use when picking my shim materials:
Table: Properties of Common Plastic Shim Materials
| Material | Mechanical Strength | Thermal Stability | Chemical Resistance | Ease of Machining | Cost Level |
|---|---|---|---|---|---|
| Nylon | High | Moderate | Moderate | Easy | Moderate |
| PTFE | Moderate | High | Excellent | Moderate | High |
| PVC | Moderate | Low | Moderate | Easy | Low |
| HDPE | Moderate | Moderate | Good | Easy | Low |
| UHMW | Moderate | Moderate | Good | Difficult | Moderate |
| Acetal | High | Moderate | Good | Moderate | Moderate |
| Polycarbonate | High | Moderate-High | Moderate | Moderate-Hard | Moderate |
This table guides me whenever I have doubts. If I’m dealing with something chemical-heavy, PTFE is a clear winner. For strength and easy machining, I often stick to nylon or acetal.
Material Thickness Availability and CNC Cutting Behavior
One critical factor when machining plastic shims is selecting the right thickness of stock material. Most plastics come in standard sheet thicknesses ranging from 0.005 inches (0.13 mm) to over 0.5 inches (12.7 mm). Thinner sheets (under 1 mm) can be tricky because they might warp or melt under frictional heat.
Here’s another reference I frequently use:
Table: Recommended Thickness and Machining Notes
| Material | Recommended Thickness | Machining Notes |
|---|---|---|
| Nylon | 0.5–10 mm | Clean cuts, minimal burrs |
| PTFE | 0.25–5 mm | Use sharp tools, slow speeds |
| PVC | 0.5–6 mm | Easy machining, watch for melting |
| HDPE | 0.5–12 mm | Cuts easily, some burr cleanup needed |
| UHMW | 1–15 mm | Use single-flute cutters to avoid chips |
| Acetal | 0.5–10 mm | Great finish, hold securely to avoid chatter |
| Polycarbonate | 0.5–8 mm | Moderate speed, coolant helps avoid melting |
Choosing Material Based on Intended Use
The intended use of your plastic shims will heavily influence your material choice. For instance, if I’m making shims for an electrical component, I’ll select PVC or Polycarbonate for their insulating properties. If I’m working on a mechanical assembly, Acetal or Nylon usually work best for structural strength.
When precision is key, Acetal and Nylon offer superior machinability. But if my shim needs chemical resistance, PTFE is always my go-to, despite the higher cost.
My Recommendations Based on Personal Experience
- General-purpose & structural shims: Nylon or Acetal
- High-precision alignment: Acetal
- High-temperature or chemical environments: PTFE
- Cost-sensitive electrical insulation: PVC
- Impact-resistant or transparent shims: Polycarbonate
- Outdoor or moisture-rich environments: HDPE
Choosing the right plastic material is critical for successful shim production. CNC machines can handle almost all plastics, but matching the material to your application ensures optimal performance and fewer headaches during machining.
Design Considerations for Machinable Plastic Shims
Designing plastic shims for CNC machining may sound simple, but there’s more to it than just cutting a thin ring or spacer. Over the years, I’ve learned that even minor design decisions can impact tolerances, surface quality, tool life, and overall part performance.
This chapter covers everything I keep in mind when preparing CAD files for CNC-cut plastic shims.
Designing CAD Files for Shim Parts
Start with the right tolerances
Since plastic materials can flex, warp, or compress, I tend to allow slightly larger tolerances than I would with metal. A general rule of thumb I use:
- For tight fits: ±0.05 mm (0.002″)
- For functional spacing: ±0.10 mm (0.004″)
- For loose fits or clearance: ±0.25 mm (0.010″)
Some CNC machines can hold tighter tolerances, but the material behavior will be the limiting factor, especially for thin sheets.
Create clean outlines
Avoid overly complex curves or corners in shim profiles. Sharp inside corners should be rounded (filleted) to match your smallest endmill diameter. I typically use a 2 mm radius minimum to ensure toolpath flow is smooth and avoid tool breakage.
Use vector-based CAD files
I export my shim drawings in DXF format from Fusion 360 or SolidWorks. For 2D shapes, this ensures toolpaths are clean, efficient, and compatible with almost any CAM software.
Hole Tolerances, Edge Clearance, Chamfers, and Pockets
Through holes for fasteners or pins
If your shim has mounting holes or alignment pins, plan their size based on the material’s thermal expansion. I usually design holes 0.1–0.2 mm larger than the mating shaft to allow easy placement without forcing.
Edge spacing
Keep any holes or cutouts at least 1 mm away from the outer edge of the shim to prevent tearing during cutting, especially with softer plastics like UHMW or HDPE.
Chamfers and rounded edges
Plastic doesn’t respond well to sharp edges, especially when assembled under pressure. If the shim will sit between two parts under load, I often chamfer or round the outer edge to reduce stress concentrations.
Avoid pockets unless necessary
While it’s possible to machine pockets into thicker plastic shims, it adds time and cost. Unless the pocket serves a structural or clearance function, I leave the shim flat and keep the design simple.
Single-Layer vs Multi-Layer Stacking Strategies
When one shim isn’t enough, I stack multiple plastic shims to hit the desired thickness. But stacking isn’t just about piling up parts—it needs planning.
Single-layer benefits
- Easier to manufacture
- More rigid
- Fewer tolerance issues
When to stack
- You need adjustability on the fly
- You’re working with shims under 0.5 mm thick
- You want to standardize inventory with modular thicknesses
Here’s a stacking approach I often use:
Table: Shim Stacking Plan for Custom Heights
| Target Thickness | Stack Configuration | Notes |
|---|---|---|
| 0.20 mm | 2 × 0.10 mm | Adjustable and accurate |
| 0.75 mm | 1 × 0.50 mm + 1 × 0.25 mm | Balanced rigidity/flexibility |
| 1.00 mm | 2 × 0.50 mm | Readily available combo |
| 1.50 mm | 1 × 1.00 mm + 1 × 0.50 mm | Stable under load |
| 2.00 mm | 2 × 1.00 mm | Simple and reliable |
| 3.00 mm | 3 × 1.00 mm | Thicker builds for structure |
When stacking, I use adhesive-backed shims for temporary assemblies, or sandwich the layers tightly between bolts or clamps. If consistent thickness is critical, I measure the final stack with a micrometer and adjust as needed.
Labeling and Color-Coding for Version Control
One thing I started doing that has saved me a ton of time is color-coding or laser-marking my shims.
- Color-coding by thickness: You can order colored plastic sheets or add ink marks after cutting. I use red for 0.10 mm, yellow for 0.25 mm, green for 0.50 mm, and black for 1.00 mm.
- Laser engraving part numbers: If you’re cutting dozens of similar shims, it helps to mark the part ID, revision number, or thickness directly on the part.
- QR code labels: For production builds, I’ve printed QR labels that link back to the CAD file or design sheet—very useful in team environments.
This makes managing batches easier and helps avoid confusion in mixed-use assemblies.
My Design Advice in a Nutshell
- Keep it simple when possible.
- Avoid tight holes unless needed.
- Stack smart—don’t reinvent the wheel each time.
- Document everything. Even for a 0.3 mm shim.
Designing plastic shims for CNC machining isn’t just about geometry—it’s about creating parts that perform under real-world conditions. A well-designed shim saves time, reduces rework, and ensures precise results. I always say: the best shim is the one you never have to touch again after installation.
CNC Machine Setup for Plastic Shim Cutting
Getting your CNC machine properly set up for cutting plastic shims is one of the most important—and often underestimated—parts of the entire process. A solid setup ensures your cuts are clean, your dimensions are accurate, and your tooling lasts longer. Over the years, I’ve made enough mistakes here to learn what works and what doesn’t. In this chapter, I’ll walk you through what I now consider my go-to setup checklist for CNC-machining plastic shims.
Recommended Machines: Router, Mill, or Desktop CNC
Most plastic shim cutting doesn’t require heavy-duty industrial equipment. In fact, I started making my first shims using a desktop CNC router. The trick is knowing your machine’s limitations and choosing the right one for your shim volume and precision needs.
Router-Style CNCs
- Great for thin plastic sheets
- Ideal for quick prototyping and small batch runs
- Use with vacuum beds or tape fixtures
Benchtop Mills
- Offer better rigidity and Z-axis precision
- Handle thicker materials and tighter tolerances
- Slower but better surface quality
Large-Format CNCs
- Best for batch shim production or large sheet nesting
- Can combine multiple shims in a single cut cycle
- Often used with vacuum hold-down or fixture plates
If you’re just starting out, even a 3018 desktop CNC can produce accurate plastic shims—so long as the setup is dialed in.
Fixturing Soft Plastic Sheets Without Distortion
Plastic sheets can flex, warp, or lift during cutting if not held properly. I’ve tried everything from blue painter’s tape to industrial vacuum tables. Here’s what actually works:
Double-Sided Tape
- Ideal for small shims or thin sheets (< 2 mm)
- Cheap and fast
- Just be careful removing parts to avoid bending them
Vacuum Beds
- Best for thin, large-format sheets
- Uniform hold-down with no clamps in the toolpath
- Requires a flat, leak-proof spoilboard
Low-Pressure Clamps
- Work well with thicker stock (3 mm+)
- Use wide-face clamps to avoid pressure marks
- Avoid over-tightening, especially with soft plastics like UHMW
Painter’s Tape + CA Glue
- A popular hybrid method for hobbyists
- Tape both the table and material, then glue tape to tape
- Clean removal with alcohol
Whatever method you use, make sure your stock is perfectly flat and secure before starting. A loose edge can destroy a small endmill in seconds.
Best Workholding Practices: Avoiding Warping or Lifting
Here are some general rules I follow when fixturing:
- Always wipe the stock clean before applying tape or clamps
- Avoid clamping close to cut edges; use scrap material as a buffer
- Keep Z-axis travel minimal to avoid long tool drops on thin material
- Use a spoilboard to prevent table damage and reduce chip-outs
And remember: soft plastics are far more sensitive to uneven pressure than metals. Over-fixturing can do more harm than good.
Toolpath Strategies for Clean, Accurate Shims
Cutting plastic shims successfully requires more than just selecting the right endmill. Your CAM strategy needs to account for part movement, heat buildup, and finishing quality.
Inside-First Cutting
- Always cut inner holes or slots before the outer profile
- Prevents part movement during final contour pass
Use Tabs Strategically
- Add small tabs (0.3–0.5 mm height) on the outer edge
- Keeps shim in place until the job is done
- Remove tabs with a flush cutter or deburring knife
Ramp or Helix Into Cuts
- Avoid plunging directly into plastic—it causes melting and burrs
- Use a spiral or ramp entry whenever possible
Use Finishing Passes
- A light final pass (0.1 mm step-over) improves edge quality
- Removes burrs and reduces tool deflection effects
Here’s a quick example of how I normally program a cut:
- Pocket Holes First – 2 passes, full depth
- Profile Inner Holes – 1 mm step-down, 2 passes
- Outer Contour – Roughing pass + finishing pass
- Tab Cleanup – Manual trim or secondary pass
My CNC Setup Checklist for Plastic Shims
| Step | Setting/Tip |
|---|---|
| Machine Type | Router or Mill with rigid Z-axis |
| Material Fixing | Tape + CA glue or vacuum table |
| Spindle Speed | 10,000–18,000 RPM |
| Feed Rate | 300–800 mm/min (depends on material) |
| Depth per Pass | 0.3–1.0 mm (lighter for thin sheets) |
| Coolant or Air Assist | Optional but reduces heat buildup |
| Toolpath Order | Inside → Outside, always |
| Tab Size | 0.3–0.5 mm height, small parts only |
This setup works consistently across a wide range of materials and shim shapes. Getting this right makes the rest of the process smooth—and lets you produce clean, accurate, and repeatable plastic shims.
Tooling and Cutting Parameters for Plastic Shims
Once your machine is set up, the next big variable is tooling—what kind of cutter you use, how fast you spin it, and how deep you go per pass. When you’re making thin, precise components like plastic shims, these decisions really matter.
I’ve burned through my fair share of bits (and plastic stock) learning what works and what doesn’t. Below is what I now use as a reference every time I need to dial in a new plastic material.
Ideal Endmills for Plastic Shim Cutting
The single most important factor for clean plastic cuts is tool geometry. Standard metal-cutting endmills will work, but they’re far from ideal.
My go-to choices:
- Single-Flute Upcut Endmill (Carbide):
Great for soft plastics like HDPE, UHMW, and PVC. Clears chips quickly and minimizes melting. - O-Flute Endmill:
Specifically designed for plastics. Excellent chip evacuation and less heat buildup. My #1 pick for thin plastic sheets. - Double-Flute Straight Endmill:
Useful for harder plastics (like Acetal) where I want a flatter surface finish. Less aggressive chip pull means less risk of lifting the part. - Downcut Bit (for thin sheets):
Prevents lifting on the top surface, especially when tape or light clamping is used. Best for final pass finishing.
RPM, Feedrate, and Depth Per Pass by Material
Here’s a table of the baseline parameters I use when cutting plastic shims:
Table: Tested Cutting Parameters for Common Plastic Shim Materials
| Material | Tool Type | RPM | Feed Rate (mm/min) | DOC/Pass (mm) | Notes |
|---|---|---|---|---|---|
| Nylon | O-Flute, 1-flute upcut | 14,000 | 600–900 | 0.5–1.0 | Clean finish, minimal burrs |
| PTFE | Single-flute upcut | 10,000 | 300–500 | 0.3–0.5 | Lubricate to avoid gumming |
| PVC | O-Flute | 12,000 | 500–800 | 0.5–1.0 | Melts easily, use shallow passes |
| HDPE | Single-flute upcut | 16,000 | 700–1,200 | 1.0 | Use air blast to clear chips |
| UHMW | O-Flute | 10,000 | 400–600 | 0.5 | Gummy, use finishing pass |
| Acetal | 2-flute straight | 14,000 | 700–1,000 | 1.0 | Crisp finish, low burrs |
| Polycarbonate | Downcut, O-Flute | 12,000 | 500–700 | 0.5 | Use coolant to avoid melting |
DOC = Depth of Cut
These are baseline values I tweak depending on shim thickness, machine rigidity, and clamping strength.
Avoiding Melting, Chipping, or Warping
Plastics behave differently than metals. They melt, they gum up, and they vibrate in weird ways. Here’s how I avoid common problems:
Melting
- Reduce spindle speed or increase feedrate to lower friction
- Use sharp tools with a high rake angle
- Add compressed air or a mist coolant if available
Chipping
- Happens with hard plastics like polycarbonate or acetal
- Reduce feedrate slightly and use a finishing pass
- Ensure the tool isn’t dull
Warping
- Caused by heat buildup or poor fixturing
- Use vacuum or tape-and-glue hold-down
- Machine symmetrical parts or nest pieces tightly to reduce distortion
Finishing the Cut: Edge Cleanup and Burr Removal
After the cut, I typically do some quick manual finishing depending on the application:
- Deburring Tool / Hand Chamfer:
A fast way to clean up small tabs or rough edges. - Scotch-Brite Pad or Nylon Brush Wheel:
Great for giving the shim a smooth feel—important for hand-assembled parts. - Flame Polishing (optional):
For thicker plastic edges, a quick flame pass can give a glassy finish. I rarely use this on shims but it’s a trick worth knowing.
Tool Maintenance Tips
- Keep separate endmills for plastics only—they stay sharper longer
- Clean cutters after every job with alcohol or plastic-safe degreaser
- Inspect edges under light to catch micro-chipping early
Tolerance Control and Surface Finish Quality
When I first started making plastic shims with a CNC, I didn’t think too much about tolerances. I was focused on shape and size. But over time—especially when making shims for mechanical assemblies—I learned that precision matters more than expected. Even a 0.1 mm error can cause poor fit, misalignment, or wear.
In this chapter, I’ll share how I manage tolerances and surface finish to ensure that CNC-machined plastic shims are not just functional but production-ready.
Maintaining Tight Tolerances in Thin or Flexible Plastics
Most plastic shims fall in the 0.1–2.0 mm thickness range, and that brings unique challenges. Thin materials tend to flex, warp, or even “flap” under the tool. If not controlled, this movement creates dimension drift—especially around holes and fine features.
What works for me:
- Limit your DOC (depth of cut) to 50% or less of the shim thickness per pass
- Use sharp single-flute tools with polished flutes for soft plastics
- Clamp firmly but not excessively—you don’t want deformation before cutting
- Avoid plunges—always ramp into cuts for smoother tool engagement
- Finish with a spring pass—a zero-depth cleanup cut removes micro-deviations
I check shim thickness and dimensions with a digital caliper, but for higher accuracy, I use a micrometer. Especially when I’m machining shims to be stacked, tolerance consistency is everything.
Deburring and Edge Finishing Techniques
A clean edge isn’t just about looks. Burrs can affect assembly fit, electrical insulation performance, and even create particles in sensitive devices like optical housings or medical tools.
Here’s how I clean up CNC-cut plastic shims:
Basic Methods
- Hand deburring tool: Fast and accurate for inner/outer holes
- Nylon brush wheel: Great for soft edges, especially in large volumes
- Micro file set: For tiny or oddly shaped cutouts
Advanced Methods
- Scotch-Brite wheel: Works well for acetal and PVC shims, gives a nice matte finish
- Edge chamfering with 45° tool: Adds a beveled edge that looks professional and removes sharpness
- Laser marking cleanup: If you mark your shims with a laser, lightly polish around the mark to remove haze or edge artifacts
Measuring Tools and QA Checklist for Plastic Shims
If you’re making plastic shims for customers, quality assurance becomes a priority. Here’s the simple QA checklist I’ve used for both prototype and production work:
Plastic Shim QA Checklist
| QA Step | Tool Used | Pass Criteria |
|---|---|---|
| Thickness Measurement | Micrometer | ±0.02 mm |
| Outer Dimensions | Digital Caliper | ±0.05 mm |
| Hole Diameter | Pin Gauge / Caliper | ±0.03 mm |
| Surface Finish Quality | Visual + Finger | Smooth, no melt lines or burrs |
| Edge Cleanliness | Visual + Wipe | No splinters or plastic fuzz |
| Warp or Curl | Flat Plate | Shim lies flat < 0.3 mm variation |
| Part Labeling (if needed) | Visual | Clear engraving or ink readable |
Visual and Dimensional Standards in Industrial Use
Most industries don’t require shims to look beautiful—but they must be consistent, reliable, and clean. Here are the appearance and performance targets I usually aim for in production:
- Dimensional accuracy: Within ±0.05 mm for key dimensions
- Edge quality: No visible burrs or frayed corners
- Surface finish: No drag marks, melting, or tool chatter
- Visual inspection: Uniform color and material quality
- Flatness: Lies flat without rocking on a granite surface
In client work, I often take macro photos under lighting to document finish quality—especially for medical or aerospace applications where tolerances are audited.
Quick Reference: CNC Shim Tolerance & Finish Table
| Application Type | Typical Tolerance | Required Finish | Inspection Method |
|---|---|---|---|
| Automotive Spacer | ±0.10 mm | Smooth, light deburring | Caliper + visual |
| Aerospace Fitting | ±0.03 mm | No burrs, laser ID okay | Micrometer + pin gauge |
| Medical Housing Shim | ±0.05 mm | No contamination marks | Clean room visual |
| Robotics Sensor Pad | ±0.10 mm | Smooth, no sharp edges | Caliper + edge check |
| Consumer Electronics | ±0.20 mm | Clear label, good edge | Visual + tape fit test |
Prototyping and Batch Production Considerations
One of the best parts of using CNC to manufacture plastic shims is the flexibility it gives me to produce a few test pieces—or hundreds—without having to invest in dies, tooling, or long lead times. Whether I’m prototyping a custom shim for a one-off fixture or preparing a short-run batch for a client, the same CNC workflow scales up beautifully.
But production brings its own challenges—especially when trying to optimize cost, accuracy, and efficiency. Here’s how I manage both prototype development and batch production of plastic shims using CNC.
Optimizing for Low-Volume Runs vs Full Batches
Prototyping (1–10 units)
When I’m testing a shim shape or verifying a tolerance, I keep the setup lean:
- I use offcut plastic sheets or scrap material.
- CAM toolpaths are simplified—just rough + finish passes.
- I manually deburr and measure each piece.
For quick tests, I often leave the protective film on the plastic while cutting to keep the finish clean.
Batch Production (10–500+ units)
When producing a few hundred shims, I focus on:
- Fixturing efficiency: vacuum hold-downs or taped sheets
- Nesting multiple parts per sheet to reduce waste
- Automating deburring with a nylon wheel or brush
- Printing labels or engraving identifiers directly in the G-code
Most of the time, I find 100–250 shims to be the “sweet spot” for small shops—large enough to benefit from batch processing, but small enough to avoid high-volume setup costs.
Nesting Shims on Sheet Stock Efficiently
Maximizing material use is key in batch work. I often take time to nest parts in a way that:
- Minimizes tool travel between parts
- Avoids sharp corners or tool lift zones near the edge
- Leaves space for tabs or part grab points
Tips I’ve found helpful:
- Use 1–2 mm spacing between parts to prevent heat buildup
- Rotate parts for optimal fit—especially if symmetrical
- Mirror parts when possible to improve yield
- Use nesting software like DeepNest or CAM-integrated tools
Here’s an example of how I calculate material usage per batch:
Table: Material Yield for Plastic Shim Production (200 × 100 mm Sheet)
| Shim Size (mm) | Sheet Size (mm) | Parts per Sheet | Material Waste (%) | Notes |
|---|---|---|---|---|
| 50 × 50 | 200 × 100 | 8 | ~12% | Good balance for taping |
| 40 × 40 | 200 × 100 | 10 | ~9% | Higher density, tighter tabs |
| 25 × 25 | 200 × 100 | 20 | ~5% | Max yield, deburring needed |
| 60 × 40 | 200 × 100 | 6 | ~18% | Lower yield, fewer tool lifts |
The key is balancing yield with part quality—overcrowding the sheet leads to edge melting or tool vibration.
Cost-Per-Part Comparison: CNC vs. Laser Cutting or Die Stamping
Here’s a cost breakdown I often use when deciding how to make plastic shims. These are approximate and vary by region and shop setup.
Table: Manufacturing Method Comparison
| Method | Ideal Quantity | Setup Cost | Cost per Shim (est.) | Tolerance | Lead Time |
|---|---|---|---|---|---|
| CNC Machining | 1–500 | Low | $0.30–$2.00 | ±0.05 mm | 1–2 days |
| Laser Cutting | 100–5,000 | Medium | $0.10–$0.50 | ±0.10 mm | 2–5 days |
| Die Stamping | 1,000+ | High | <$0.05 | ±0.03 mm | 2–3 weeks |
I choose CNC 90% of the time for its balance of speed, cost, and flexibility—especially when tolerances under ±0.05 mm or unique shapes are needed.
When to Scale from CNC to Die-Cut Production
If you’re making thousands of identical shims regularly, then yes—die stamping becomes the smarter choice. But here’s when I make the call to shift:
- Order volumes consistently exceed 1,000/month
- Part geometry is simple and flat (no custom features)
- Lead time is predictable and cost matters more than flexibility
In most other cases, CNC machining continues to serve my needs—especially because any design revision can be implemented same-day without tooling changes.
Troubleshooting Common Issues in CNC Plastic Shim Cutting
Even with the best setup, perfect CAD files, and quality materials, things can still go wrong when machining plastic shims. I’ve had parts melt mid-cut, edges chip, dimensions drift, and surfaces warp. The good news is: these issues are usually easy to fix—if you know what to look for.
This chapter outlines the most common problems I’ve encountered when CNC machining plastic shims, along with the fixes that have worked best for me.
1. Warping During the Cut
What happens:
The plastic shim lifts, bows, or curls—especially near thin sections or holes.
Causes:
- Heat buildup softens the material
- Inadequate fixturing or uneven clamping
- Excessively aggressive cutting forces
Fixes:
- Use more uniform hold-down methods (e.g., vacuum table, tape+glue)
- Reduce depth of cut per pass
- Use sharp single-flute endmills to reduce cutting pressure
- Keep sheet material flat before starting (store flat, not rolled)
2. Melted or Gummy Edges
What happens:
Edges become rough, sticky, or visibly melted.
Causes:
- Tool is too dull or spinning too fast
- Feedrate too low, causing rubbing instead of cutting
- No chip removal or cooling airflow
Fixes:
- Use O-flute or polished tools specifically for plastic
- Increase feedrate, reduce RPM
- Add air blast or mist coolant
- Use climb cutting to lower tool friction
3. Chipping or Fractured Corners
What happens:
Edges of the shim chip off, especially on harder plastics like acetal or polycarbonate.
Causes:
- Too much force on exit cuts
- Dull tools or improper toolpath order
- Poor workholding near edges
Fixes:
- Cut interior features first, outer profile last
- Use smaller step-downs on finishing passes
- Use tabs on thin corners to hold them in place
- Switch to downcut tools for top-edge quality
4. Inconsistent Dimensions
What happens:
One shim fits perfectly—others don’t. Thickness, hole sizes, or outlines vary slightly.
Causes:
- Material not flat during cutting
- Tool deflection or worn endmills
- Heat expansion causing part growth during cut
Fixes:
- Use spring passes or final light finishing cuts
- Inspect and replace tools regularly
- Let material cool between passes
- Take consistent Z-zero readings (don’t rely on a single probe point)
5. Poor Surface Finish or Tool Chatter
What happens:
Surface looks torn, has grooves, or vibrates during cutting.
Causes:
- Tool not rigid enough or too long for material
- Excessive spindle speed without matching feedrate
- Material flexing under tool pressure
Fixes:
- Use stub-length tools where possible
- Dial in speed/feed based on chip load calculator
- Reduce pass depth and engage material more gradually
- Improve fixturing to eliminate bounce
6. Tabs Breaking or Not Holding Parts Securely
What happens:
Small shims break free during machining or fall into the vacuum.
Causes:
- Tabs too small or placed incorrectly
- Thin parts too flexible to hold their shape
- Toolpath cuts away structural areas too early
Fixes:
- Use at least 2–3 tabs per part, each 0.5–1.0 mm high
- Place tabs on long straight edges
- Leave outer contour for the final operation
- Use sacrificial carrier layers for extra support
7. Burrs or Fuzzy Edges After Cutting
What happens:
Edges have plastic whiskers or tiny tags left behind.
Causes:
- Tool not sharp enough
- No finishing pass
- Incorrect tool direction (conventional vs climb milling)
Fixes:
- Always use a light finishing pass (0.1–0.2 mm)
- Use climb milling to reduce burrs
- Deburr with nylon brush or scraping tool immediately after machining
Quick Reference: Problems and Solutions Table
| Problem | Likely Cause | Recommended Fix |
|---|---|---|
| Warping or curling | Heat buildup, poor hold-down | Use vacuum, reduce DOC, ensure flat stock |
| Melted edges | Too much friction | Increase feed, use O-flute, apply air blast |
| Chipping on corners | Tool exit stress | Add tabs, use downcut, finish passes |
| Dimensional variation | Material movement, heat | Light final pass, inspect tool, let cool |
| Poor finish/chatter | Flex, wrong tool | Stiffer setup, stub tools, slower DOC |
| Tabs breaking too early | Wrong tab settings | Increase tab size, move contour last |
| Burrs on edges | Dull tool, poor path | Sharp cutter, climb milling, edge cleanup |
Summary And CNC Shim Cutting Checklist
Making plastic shims with a CNC machine has completely changed how I approach precision spacing and alignment challenges. Whether I’m prototyping a new sensor mount or running a small batch of custom insulators, CNC gives me total control—over dimensions, materials, and delivery time.
The flexibility to design exactly what I need, cut it within minutes, and tweak designs with zero tooling cost is a huge advantage. And for those of us working in small shops, maker spaces, or low-volume production environments, it turns shimming from a guessing game into an exact science.
What We Covered:
- Why CNC is ideal for making plastic shims, especially when you need non-standard shapes, custom hole patterns, or specific material properties
- What materials to use for different industries and environments—from Nylon to PTFE to Acetal
- How to design plastic shims for machining, including tolerances, stackability, and labeling strategies
- Machine setup, fixturing, and cutting strategies for accuracy, repeatability, and surface quality
- How to troubleshoot common issues, including warping, burrs, and inconsistent dimensions
If you’re already familiar with CNC machining, the learning curve is minimal—and the payoff is big.
✅ CNC Plastic Shim Cutting Checklist
| Step | Details |
|---|---|
| Select Material | Match use case (strength, temp, chemical resistance) |
| Design CAD File | Include hole clearances, chamfers, and ID marks |
| Choose Tool | O-flute or single-flute endmills for clean cutting |
| Fixturing Method | Vacuum, double-sided tape, or CA+blue tape combo |
| Set Feeds & Speeds | Refer to material feedrate chart (Chapter 6) |
| Cut Order | Inside features first, then outside contour |
| Use Tabs or Carrier | Prevent shim movement or ejection during cut |
| Deburr + Inspect | Hand deburring + QA checklist (thickness, holes, flatness) |
| Batch Tracking | Add labels, codes, or logs for production consistency |
Having this checklist printed near my CNC has saved me hours of wasted material—and made customer deliveries much more predictable.
FAQ
Here are answers to some of the most common questions I get about using CNC machines to produce plastic shims.
1. What materials are best for CNC plastic shims?
Nylon, Acetal (Delrin), and PTFE are excellent choices. Each offers different benefits like strength, heat resistance, and machinability.
2. How thin can I cut plastic shims on a CNC machine?
You can reliably cut down to 0.2 mm (0.008″) with proper fixturing. For ultra-thin materials, reduce spindle speed and use a sharp O-flute bit.
3. What’s better for shim cutting—CNC or laser?
CNC offers tighter tolerances and cleaner cuts on thicker materials. Laser cutting is faster for high volumes but can leave heat-affected zones and isn’t suitable for all plastics.
4. Can I cut multiple shims at once?
Yes, you can stack thin plastic sheets with adhesive layers or sandwich them between sacrificial boards. Be careful to maintain Z-zero accuracy.
5. How do I stop the shim from moving during cutting?
Use double-sided tape, a vacuum table, or the painter’s tape + CA glue method. Always cut inner profiles first.
6. Can I engrave text or part numbers onto plastic shims?
Yes. Use a V-bit or laser marker to engrave part IDs, batch numbers, or QR codes.
7. How do I get a clean edge without burrs?
Use sharp tooling, climb milling, and a light finishing pass. Then lightly deburr by hand or with a brush.
8. Do plastic shims compress under pressure?
It depends on the material and load. PTFE and UHMW are softer, while Acetal and Nylon hold shape better. Always test for your specific use.
9. How do I reduce melting during cuts?
Lower spindle speed, increase feedrate, and use an air blast or mist cooling if needed.
10. Are CNC shims reusable?
Most are. If used for non-permanent assembly or prototyping, plastic shims can be cleaned and reused multiple times.
11. Can I produce hundreds of plastic shims efficiently with CNC?
Absolutely. Use nesting, consistent toolpaths, and efficient fixturing to process dozens or hundreds per day.
12. What’s the standard tolerance I can expect?
With proper setup, ±0.05 mm is achievable on most desktop or benchtop CNCs. Industrial machines can go tighter.
13. How should I store cut plastic shims?
Keep them flat in labeled containers, sorted by thickness and material. Avoid bending or stacking different types together.
14. Can CNC machines cut flexible or rubber-like plastics?
Yes, but it’s harder. Use sharp tools, slow feeds, and avoid thin unsupported areas to prevent dragging or tearing.
15. Can I automate shim production for e-commerce or small-batch sales?
Yes. I’ve sold custom shim kits online. Combine CNC cutting with barcode tracking and batching strategies for small-scale manufacturing.
References
To back up this guide with reliable, authoritative sources, consider these quality references. Each link points directly to the cited information:
- Shim (spacer) definition and applications
– “A shim is a thin and often tapered or wedged piece of material, used to fill small gaps or spaces between objects…” [Wikipedia]
→ https://en.wikipedia.org/wiki/Shim_%28spacer%29 (en.wikipedia.org) - Overview of CNC plastic machining
– “Plastic CNC machining is a cutting‑edge manufacturing process that utilizes computer numerical control (CNC) technology to shape plastic materials into precise parts…” [Uptive]
→ https://uptivemfg.com/plastic-cnc-machining/ (uptivemfg.com) - Best plastics for CNC machining
– “The best plastic materials for milling are Acetal, PEEK, and PVC… Delrin is the best plastic for tight tolerance machining…” [Atlas Fibre]
→ https://www.atlasfibre.com/maximizing-precision-a-guide-to-the-best-millable-plastics-for-cnc-machining/ (atlasfibre.com) - Spacer and standoff context in assemblies
– “A spacer is a solid material used to separate two parts in an assembly … can be made of metal, plastic, glass, and other materials.” [Wikipedia]
→ https://en.wikipedia.org/wiki/Spacers_and_standoffs (en.wikipedia.org)
Final Words
If you’ve made it this far, chances are you’re serious about making plastic shims the right way—with speed, precision, and confidence. Whether you’re producing 1 part or 1,000, CNC lets you take control of the entire process.
I hope what I’ve shared—from materials and design, to fixturing and finishing—helps you make better shims, faster. And maybe even build a little side business around it, like I did.
Thanks for reading. Let’s get cutting.
Other Articles You Might Enjoy
- Plastic Washers Too Specific for Off-the-Shelf? CNC Machining Has the Answer
Introduction (Brief) Plastic washers often seem like simple, minor parts. I used to think the same—until I faced an issue where standard off-the-shelf plastic washers just couldn't solve my problem.…
- Plastic Rivets Prototyping and Production machining: A Modern Solution for Complex Fasteners
Understanding Plastic Rivets: Types, Uses, and Materials Plastic rivets are versatile fasteners used to join materials in various applications. Unlike metal rivets, plastic rivets are lightweight, corrosion-resistant, and non-conductive, making…
- Precision Lock Washer Manufacturing: Best Practices, Challenges, and Solutions
I. Introduction If you've ever assembled machinery or mechanical equipment, you know how crucial small components like the lock washer can be. Despite its small size, a lock washer plays a huge…
- How CNC Machining Delivers Precision in Custom POM Plastic Parts
Working with POM plastic in CNC machining has become a popular choice for manufacturers due to its excellent mechanical properties, low friction, and high dimensional stability. Customizing parts using this…
- How Nylon Washers Are Made: From CNC Machining to Injection Molding
Introduction: What Are Nylon Washers and Why They Matter in Machining? Nylon washers are one of the unsung heroes of modern manufacturing. These simple yet versatile components are indispensable in…
- Metal Rivets and CNC Machining: From Hole Design to Final Assembly
I. Introduction Metal rivets have been around for centuries. Even in today's high-tech, precision-engineered world, they're still everywhere. From aircraft skins to laptop chassis, metal rivets provide a reliable, permanent…
- Stainless Steel Fasteners: What Designers and CNC Machinists Must Know
Why Stainless Steel Fasteners Matter in CNC Applications As someone who has spent significant time around CNC machines and designing mechanical assemblies, I've learned one critical truth: the smallest parts…
- Acetal vs Delrin for Machining: A Complete Guide for Engineers and Designers
Introduction When I first started working with plastics in CNC machining, one question kept coming up: Acetal vs Delrin – what’s the difference, and which one should I use? It sounded like…