Introduction
In my early days as a process engineer, I underestimated the importance of tensile test. I thought if the CNC machining was accurate, then the part was good. Simple as that. But I learned quickly — and sometimes painfully — that even the most precisely cut components can fail if their material properties aren’t verified. That’s where the tensile test comes in.
A tensile test isn’t just a box to tick in a quality checklist. It’s a tool we use to understand a material’s capability before it faces real-world stress — sometimes life-critical stress, especially in aerospace or medical applications.
Let me make this real: one of our aluminum parts once passed all dimensional checks after CNC machining. It looked flawless. But the part cracked during assembly. The post-failure analysis showed that it had microstructural damage from a previous heat treatment cycle, undetectable by appearance alone. A simple tensile test would’ve caught it.
So now, I think of tensile testing as part of the DNA of smart manufacturing. It doesn’t just tell me what a material is supposed to do — it tells me what it can actually do after machining, under stress, in real life.
In this article, I’ll walk you through everything I’ve learned about tensile tests for CNC-machined parts — from theory and best practices to personal lessons and real data. I’ll also show you where and how to use this knowledge to build better products, avoid costly recalls, and gain a competitive edge.
Tensile Testing: Theory and Principles
When I first learned about the tensile test, it was during a materials science lab in college. We clamped a shiny metal rod into a universal testing machine, hit the “start” button, and watched it stretch until it snapped. At the time, I thought it was just a cool demo. I didn’t realize then how that simple procedure forms the foundation of countless product safety decisions in real-world manufacturing.
What Is a Tensile Test?
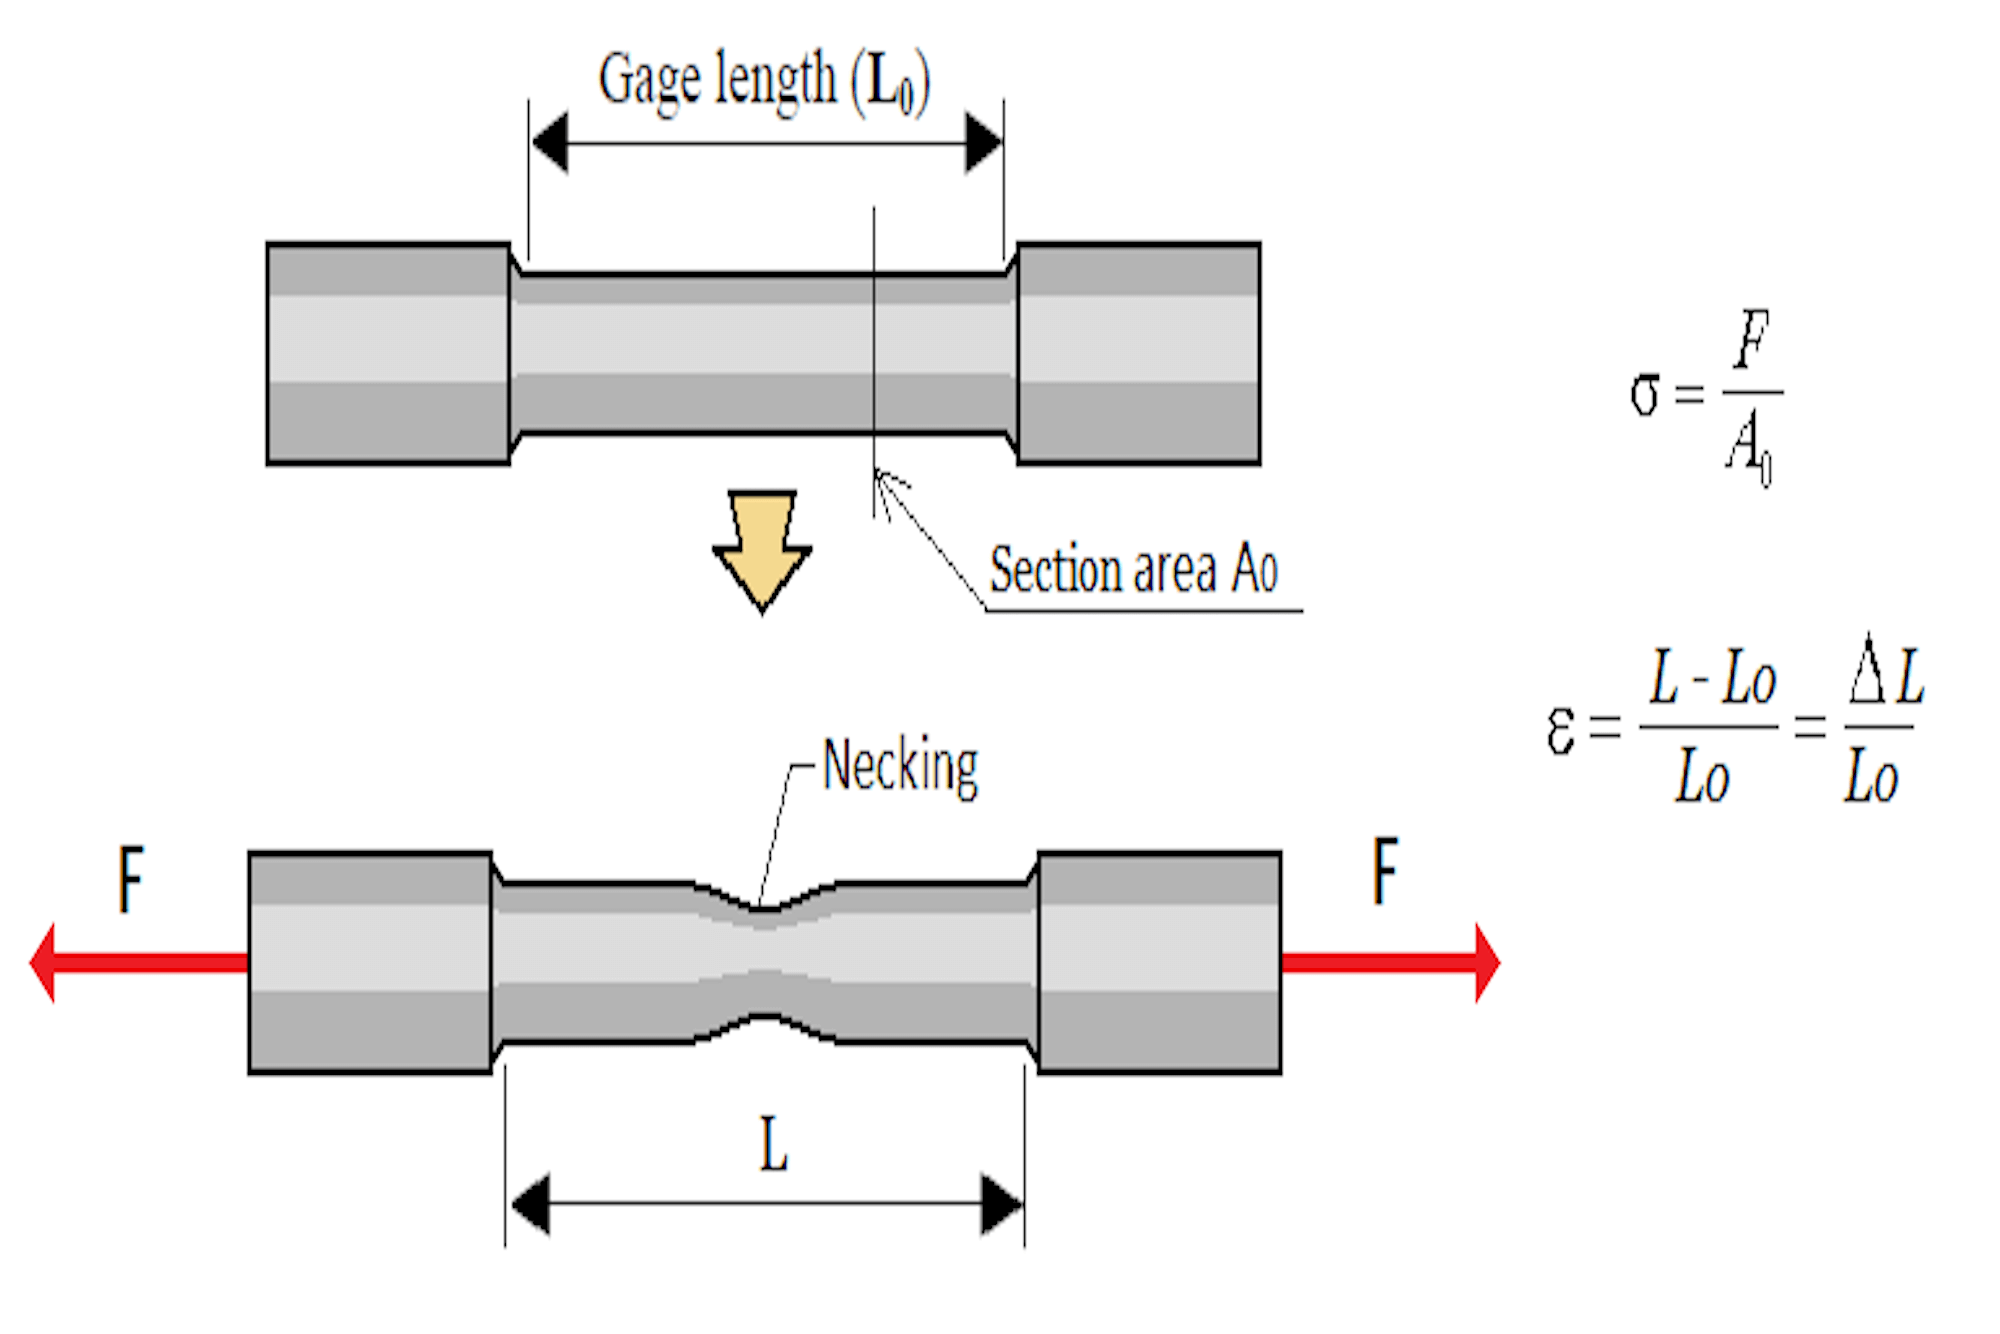
A tensile test measures how a material behaves when it’s pulled apart. Specifically, it tells us how much force a material can withstand before it breaks, how much it can stretch, and at what point it starts to deform permanently.
For CNC-machined parts, tensile testing helps us answer the question: “After all the cutting, drilling, and finishing, is the material still strong enough to do its job?”
Here’s the basic process:
- A test specimen — usually a standardized “dog bone” shape — is gripped at both ends.
- A tensile testing machine pulls the specimen apart at a controlled rate.
- Force and elongation are measured continuously until the specimen fractures.
- The data is plotted on a stress-strain curve for analysis.
This isn’t just a lab activity. It’s the foundation of design validation, quality control, and material certification across industries.
Key Concepts in Tensile Testing
Let’s break down the core measurements obtained during a tensile test:
| Property | Description |
|---|---|
| Tensile Strength | The maximum stress the material can withstand before breaking. |
| Yield Strength | The point where the material starts to deform permanently. |
| Elongation | How much the material stretches before fracture, often shown as a percent. |
| Young’s Modulus | A measure of stiffness — how much the material resists deformation. |
These values tell us whether a material is ductile or brittle, flexible or stiff, suitable for high-load structures or not.
Here’s a sample data table from recent tests we ran on CNC-machined aluminum specimens:
| Sample ID | Material Type | Yield Strength (MPa) | Ultimate Tensile Strength (MPa) | Elongation (%) | Young’s Modulus (GPa) |
|---|---|---|---|---|---|
| A-01 | 6061-T6 | 270 | 310 | 12.5 | 69 |
| A-02 | 6061-T6 | 265 | 308 | 11.9 | 68 |
| B-01 | 7075-T6 | 480 | 520 | 10.2 | 71 |
| B-02 | 7075-T6 | 475 | 518 | 9.7 | 70 |
| C-01 | PEEK | 95 | 110 | 30.1 | 4 |
| C-02 | PEEK | 93 | 108 | 29.5 | 4 |
In my own experience, understanding these metrics has helped us catch material mix-ups, detect process-induced defects, and even negotiate better terms with suppliers.
The Stress-Strain Curve: A Story in a Graph
Every tensile test results in a stress-strain curve, and it’s one of the most useful tools we have.
- Elastic Region: The slope here gives us Young’s Modulus. Deformation is reversible.
- Yield Point: Beyond this, the material won’t return to its original shape.
- Strain Hardening: The material gets stronger for a while due to internal rearrangements.
- Ultimate Strength: The peak — the most stress the material can take.
- Necking and Fracture: The final stage, where localized thinning causes breakage.
I always remind new engineers: Read the curve, not just the numbers. The curve tells a story — one that can reveal if a material is improperly processed or fatigued.
Why It Matters After CNC Machining
Now here’s where it connects directly to CNC work.
CNC machining isn’t a gentle process. It introduces:
- Thermal effects from tool friction
- Mechanical strain from clamping or deep cuts
- Surface changes that may hide subsurface issues
I’ve seen components that passed visual inspections and CMM checks but failed a tensile test due to microcracks or grain boundary embrittlement — issues invisible to the naked eye.
A tensile test after machining gives us a reality check. Did our beautiful CAD model and perfect toolpath create a part that will survive its environment? Or just one that looks good on paper?
Common Mistakes and Myths
Myth #1: If the material passed the supplier’s certificate, it doesn’t need re-testing.
Wrong. That cert covers the raw material. CNC processes can degrade it.
Myth #2: Visual inspection is enough.
Not even close. Tensile test data often reveals problems long before cracks show up externally.
Myth #3: Testing is only for aerospace or safety-critical parts.
Even consumer products — like bike frames or fitness equipment — benefit from tensile validation. Liability doesn’t discriminate.
Standards and Testing Protocols
By the time I started running my own tensile tests, I realized the biggest challenge wasn’t breaking metal—it was doing it right. A poorly executed tensile test can give misleading results, which could be worse than not testing at all. That’s why following recognized standards matters.
If you’re looking up “tensile test” online, chances are you want to make sure you’re doing it the right way. So in this section, I’ll walk you through the key standards, testing conditions, and specimen preparation guidelines that define a valid tensile test.
Common Tensile Test Standards
There are several widely accepted standards across industries. Here are the most important ones I’ve worked with:
| Standard | Organization | Common Applications |
|---|---|---|
| ASTM E8/E8M | ASTM (USA) | Metallic materials – most widely used in the U.S. |
| ISO 6892 | ISO (Global) | Internationally recognized, similar to ASTM E8 |
| JIS Z 2241 | Japan | Metallic tensile testing for Asian manufacturers |
| ASTM D638 | ASTM (USA) | Plastics and composite materials |
| ASTM E21 | ASTM (USA) | Elevated temperature tensile testing |
| ISO 527 | ISO | Plastics and reinforced materials |
Most of the aerospace clients I’ve dealt with demand dual compliance: ASTM E8 and ISO 6892-1. If you’re shipping parts internationally, you’ll likely deal with both.
Specimen Requirements
The integrity of the tensile test heavily depends on the sample geometry and preparation. You can’t just cut a random piece of metal and start pulling it.
Here’s a breakdown of standard specimen types:
| Specimen Type | Shape | Common Use | Gauge Length | Width (mm) | Thickness (mm) |
|---|---|---|---|---|---|
| Type I | Flat “dog bone” | Sheet metals, plastics | 50 mm | 12.5 | 3-6 |
| Type II | Round bar | Machined metal parts | 50 mm | Ø6–12 | — |
| Sub-size | Mini flat/round | Small CNC parts, micro parts | 25 mm | 5–10 | 1–3 |
Important note: Machining the specimen must not introduce stress. I’ve made that mistake before—rushing the sample preparation only to get inconsistent yield results later. Use a slow feed rate, cooling, and avoid tool chatter.
Test Conditions and Environment
A good tensile test is like a good experiment — controlled, repeatable, and transparent. Here’s what matters:
- Strain rate: Commonly 0.005 to 0.05 mm/mm/min. Higher rates = more scatter.
- Temperature: Room temperature unless otherwise specified. High-temp testing requires special chambers (ASTM E21).
- Gripping: Hydraulic grips preferred for metals. Pneumatic grips work well for polymers.
- Alignment: Misaligned specimens produce false breaks. I learned this the hard way.
Calibration and Verification
One of our labs failed an audit last year because they missed a load cell calibration deadline. Ever since, we run a strict schedule:
| Equipment | Calibration Frequency | Notes |
|---|---|---|
| Universal Testing Machine | Every 6–12 months | Per ISO 7500-1 |
| Extensometer | Every 6 months | Especially for automated systems |
| Thermocouples (if used) | Every 3 months | Needed for high-temp tensile testing |
Every time I get a new tensile test report, the first thing I check is whether calibration logs are attached. Without those, the numbers are just guesses.
Test Repeatability: Running Multiple Samples
Don’t test just one part and call it a day. For statistical confidence, we usually test at least 5 specimens per batch, more if it’s a critical load-bearing part.
In one project involving CNC-machined 7075 aluminum, we had one sample show a 6% lower yield strength. At first, we thought it was an error. But the second and third tests confirmed it. Turned out that part came from a corner of the stock with higher porosity.
That one tensile test saved us from sending out a compromised batch.
Reporting Format
A proper tensile test report should include:
- Material spec and heat lot
- Specimen dimensions and orientation
- Tensile strength, yield strength, elongation, modulus
- Fracture location and appearance
- Stress-strain curve (preferably attached)
- Operator, date, machine, and calibration ID
If your lab isn’t giving you this level of detail, you’re not getting a professional-grade tensile test.
Advanced Tensile Test Techniques
By now, we’ve covered the fundamentals of tensile testing—what it measures, how it’s done, and which standards guide the process. But in real-world manufacturing, especially in high-precision industries, the basics aren’t always enough.
Over the years, I’ve had to deal with unusually small CNC parts, parts made from advanced polymers like PEEK, and even components that operate under high temperatures. In those cases, traditional tensile testing methods can fall short. That’s when advanced tensile test techniques become critical.
1. Digital Extensometers and Non-Contact Strain Measurement
In classic tensile tests, strain is measured with clip-on extensometers that attach to the specimen. They work fine — until they don’t.
Some of our thin plastic parts kept slipping or snapping under the clip pressure. That’s when we switched to digital extensometers and video extensometry systems. These use high-resolution cameras and software to track deformation without touching the specimen.
Advantages:
- No mass added to the sample
- Better for soft, thin, or brittle materials
- Highly accurate and repeatable
If you’re doing high-end tensile test validation on small CNC parts (especially in aerospace or medical), digital strain tracking should be your go-to method.
2. High-Temperature Tensile Testing
In sectors like aerospace or energy, materials don’t fail at room temperature — they fail at 300°C, 600°C, or higher. I once had to validate a stainless-steel turbine blade design that would face cyclic stress at 500°C. Normal tensile tests wouldn’t give us usable data.
That’s when ASTM E21 came into play. High-temp tensile testing requires:
- A furnace around the specimen
- Thermocouples for accurate measurement
- Special grips that resist heat expansion
- Temperature soak and hold before testing
We learned that at high temperatures, even stainless steel loses 30%–50% of its strength. Not accounting for that in your design is a costly mistake.
3. Sub-Size and Miniature Specimen Testing
Ever tried cutting a tensile specimen from a 25 mm-long medical part? It’s brutal.
But miniaturized testing has come a long way. Today, we regularly test sub-size specimens taken from small CNC components without compromising the rest of the part.
Mini tensile bars, often just 2–3 mm wide, are prepared with micro-milling. They require:
- Lower load cells (0–1 kN range)
- Precision alignment tools
- Fine extensometers or digital tracking
In the table below, I’ve summarized how we compare different sizes in practice:
| Specimen Size | Gauge Length | Common Use | Equipment Needed | Typical Materials |
|---|---|---|---|---|
| Standard | 50 mm | Structural metals, sheet materials | Universal tester (5–50 kN) | Aluminum, steel, polymers |
| Sub-size | 25 mm | Small machined parts, custom samples | Precision grips, 1–5 kN load cells | Titanium, copper alloys |
| Miniature | 5–10 mm | Biomedical implants, electronics | Micro UTM, video extensometers | PEEK, ceramics, micro-alloys |
One of our most critical product launches involved validating 3D-printed surgical parts. The tensile test had to prove strength using only sub-size samples machined from actual production parts. No room for error. This method gave us the data we needed without scrapping a full unit.
4. Cyclic and Fatigue Tensile Testing
A tensile test isn’t always a one-time pull-and-break. Sometimes, you want to know how a material behaves under repeated tensile stress. This is called low-cycle fatigue testing, and it’s especially relevant for automotive and aerospace parts.
These tests simulate:
- Pressurization/depressurization in airplane cabins
- Engine cycles
- Structural vibration fatigue
They require servo-hydraulic systems and can run thousands of cycles. While not technically a “pure tensile test,” these methods extend the concept into real-world endurance testing.
5. Environmental Tensile Testing (Humidity, Saline, Corrosive Conditions)
If your product lives in the real world — oceans, rain, body fluids — then environmental tensile testing matters.
I once worked on a connector housing meant for subsea telecom cables. It passed all dry lab testing. But when exposed to 90% humidity at 40°C, the plastic became brittle. A saline tensile test revealed the polymer degraded by 25% in just three weeks.
Common conditions to simulate:
- Salt spray (ASTM B117)
- Humidity (ASTM D618)
- UV exposure
- Body fluid simulants (for implants)
Testing under expected environmental stress gives a far more realistic safety margin.
6. In-Situ Tensile Testing in SEMs or Microscopes
This one’s niche but fascinating. We once worked with a university lab where they tested micro-samples inside a scanning electron microscope (SEM). Watching the actual grain structure shift and crack in real-time as tensile stress was applied was… mind-blowing.
If you’re in advanced R&D or dealing with nanomaterials, in-situ tensile testing offers insights you simply can’t get from broken parts.
Final Thoughts on Advanced Testing
These methods aren’t for everyone — they require investment, training, and often partnership with specialty labs. But for critical products or innovative designs, advanced tensile tests offer insurance against catastrophic failure and a marketing edge when you’re proving performance.
For anyone searching for how to get more out of a tensile test, or wondering whether a simple break test is enough for complex CNC parts — the answer is no. Dig deeper. The data is worth it.
Practical Considerations in Tensile Testing of CNC-Machined Parts
If there’s one thing I’ve learned after a decade in manufacturing, it’s this: the devil is in the details. This couldn’t be truer when it comes to running a tensile test on CNC-machined components. You can follow all the standards and calibrate your machines perfectly, but if you ignore the real-world impact of machining variables, your tensile test results might be worse than useless — they might be misleading.
So in this section, I’ll break down what I’ve seen, tested, and corrected in the field. These are practical considerations that go beyond lab protocols and into the messy world of production.
1. Residual Stress from CNC Machining
One of the biggest hidden threats to tensile strength is residual stress. It builds up during machining due to:
- Cutting tool pressure
- Clamping forces
- Heat from tool-workpiece friction
These stresses don’t show up on the surface, but they distort internal crystal structures and create microcracks — both of which reduce strength.
In one project involving CNC-turned 7075 aluminum shafts, we ran tensile tests before and after machining. Here’s what we saw:
| Condition | Ultimate Tensile Strength (MPa) | Yield Strength (MPa) | Elongation (%) |
|---|---|---|---|
| Pre-machined raw bar | 520 | 475 | 10.2 |
| After CNC machining | 497 | 460 | 8.5 |
| After stress relief | 518 | 470 | 9.8 |
You can see the drop. Adding a stress-relief heat treatment brought values back in line. This isn’t optional — it’s engineering necessity.
2. Surface Finish and Subsurface Defects
Another common issue I’ve run into is assuming that a part’s surface finish has no impact on a tensile test. Big mistake.
Rough surfaces from aggressive machining can:
- Initiate cracks sooner
- Trap contaminants
- Cause uneven stress distribution
We once ran tests on CNC-milled stainless-steel coupons with two finishes: standard (Ra ≈ 3.2 µm) and polished (Ra ≈ 0.8 µm). Here’s what we learned:
| Finish Type | UTS (MPa) | Yield (MPa) | Elongation (%) | Failure Mode |
|---|---|---|---|---|
| As-machined | 605 | 520 | 9.4 | Edge cracking |
| Polished | 622 | 525 | 11.1 | Uniform necking |
Even though both parts passed, the polished version had more predictable failure and slightly better performance.
Lesson: If your application is fatigue-sensitive or mission-critical, test polished specimens or test real-world finishes and factor in variability.
3. Machining Directionality and Grain Orientation
This one’s subtle but powerful. CNC machining often happens in a single axis or plane — which means it affects the grain flow and fiber direction of metals and composites.
For example, in rolled metals like 6061-T6 aluminum, the grain runs lengthwise. If you cut tensile specimens perpendicular to the grain, your UTS can drop by 10% or more.
We ran a comparison:
| Orientation | UTS (MPa) | Yield (MPa) | Elongation (%) |
|---|---|---|---|
| Parallel to grain | 310 | 270 | 12.5 |
| Perpendicular | 278 | 260 | 10.1 |
For precision aerospace parts, that could mean the difference between success and structural failure.
Always note your specimen orientation. And if you’re testing the actual CNC part (not a machined test bar), make sure the direction matches the stress direction in real use.
4. Heat Treatment After Machining
Heat-treated metals (like 7075-T6 or Ti-6Al-4V) can lose hardness and tensile strength if they’re overheated during machining. We saw this in a batch of CNC parts that underwent aggressive high-speed milling. The cutting temperature exceeded 300°C, and when we ran tensile tests, UTS had dropped by nearly 15%.
Solution: Use thermal sensors during critical operations and re-validate tensile properties post-machining. When in doubt, re-heat-treat before final machining.
5. Sample Extraction from CNC Parts
Sometimes, you can’t or don’t want to test raw bar stock — you need to test the finished part itself.
We’ve used EDM (electrical discharge machining) to extract tensile coupons from precision parts. It avoids introducing stress during cutting, but it’s slow and requires careful planning.
Things I’ve learned:
- Always extract from areas that represent the stress zone in service
- Don’t cut across welds or parting lines unless that’s what you’re testing
- Document every step — auditors love traceability
6. Reproducibility Across CNC Batches
One of the most frustrating experiences I’ve had was running perfect tensile tests on a prototype batch, only to see 12% lower results in production. The culprit? Slight differences in feed rates, tool wear, and cooling between CNC machines.
We started using statistical process control (SPC) to track:
- Tool change intervals
- Surface roughness logs
- Residual stress checks with X-ray diffraction
Once we tied tensile test results to process variables, we finally understood the full picture.
7. Fixture and Clamping Issues During Testing
Even if you prep everything right, one last place things can go wrong is during the test itself.
Make sure:
- Grips match specimen geometry (round grips for rods, flat grips for sheets)
- No slippage occurs — this ruins strain data
- Alignment is checked with dial indicators or laser guides
We lost an entire day of tensile testing once because our flat grips slightly misaligned the specimens, causing early fracture on the grip edge. Fixing that simple error improved data consistency by 20%.
Putting It All Together
So, how do you run tensile tests on CNC parts that actually tell the truth?
- Control your machining process.
- Account for stress, orientation, and finish.
- Prep samples the smart way.
- Track results — and link them back to production settings.
If you’re serious about using tensile test data to make good decisions, these real-world practices are just as important as the theory or machine specs.
Case Studies and Data Interpretation
Data is only useful if we know what to do with it. I’ve seen engineers run tensile tests, print the reports, and toss them in a binder — never reviewed, never analyzed. That’s a waste. In my experience, interpreting tensile test data is one of the most valuable things we can do to improve product reliability and avoid failure down the line.
In this section, I’ll walk through a few real-world case studies from our own testing projects. These illustrate how proper tensile testing — and knowing how to read the results — helped us catch manufacturing issues, improve product design, and even reduce costs.
Case Study 1: CNC-Machined 6061-T6 Aluminum Brackets
Background:
We were producing aerospace brackets machined from 6061-T6 plate stock. Initial samples looked great, with tight tolerances and excellent surface finish. But during tensile testing, we noticed yield strength was consistently 8–12% lower than expected.
Process:
We took samples:
- From raw material
- After rough CNC machining
- After final finishing and anodizing
Tensile Test Results:
| Sample Stage | Yield Strength (MPa) | UTS (MPa) | Elongation (%) | Notes |
|---|---|---|---|---|
| Raw stock | 275 | 310 | 12.0 | As expected |
| Post-machining | 260 | 295 | 10.5 | Slightly lower |
| Post-anodizing | 248 | 282 | 9.2 | Significant drop observed |
Diagnosis:
The anodizing process included a bake cycle that overheated the part beyond the T6 tempering limit.
Action Taken:
We switched to a lower-temperature anodizing process and included post-processing hardness checks. Strength values returned to normal.
Case Study 2: 7075-T6 CNC Shafts Showing Random Failures
Background:
A client reported sporadic failures in 7075-T6 aluminum shafts. The parts passed dimensional inspection and had valid material certs. We ran tensile tests to find the root cause.
Sample Group:
- 10 shafts from the same lot
- Extracted round bar specimens from the center of each
Tensile Test Data:
| Sample ID | Yield (MPa) | UTS (MPa) | Elongation (%) | Fracture Observation |
|---|---|---|---|---|
| S1 | 474 | 519 | 9.6 | Clean necking |
| S2 | 466 | 510 | 8.8 | Minor voids near surface |
| S3 | 451 | 498 | 7.2 | Intergranular fracture |
| S4–S10 | 470–475 | 510–518 | 9.0–10.1 | Normal fracture patterns |
Interpretation:
Sample S3 had a significantly different fracture pattern, indicating internal porosity or improper heat treatment.
Action Taken:
We scanned the rest of the batch with ultrasonic testing and rejected 8 parts. Supplier was contacted for material traceability, revealing an out-of-spec aging cycle.
Lesson:
Even one bad part in a batch can be a symptom of a systemic issue. Tensile tests plus fracture analysis gave us a complete picture.
Case Study 3: High-Performance Polymer (PEEK) Implants
Background:
Our client needed tensile validation on CNC-machined PEEK parts used in spinal implants. These parts were extremely small and had strict FDA performance requirements.
Challenges:
- Sub-size specimens only
- Stress must match in-use direction
- Elongation is very high in PEEK (30%+)
Tensile Test Setup:
- Digital extensometer (non-contact)
- Micro-grip fixtures
- Strain rate: 0.01 mm/mm/min
Results:
| Sample ID | Yield (MPa) | UTS (MPa) | Elongation (%) | Modulus (GPa) | Notes |
|---|---|---|---|---|---|
| P1 | 98 | 112 | 32.0 | 3.9 | Clean curve |
| P2 | 95 | 109 | 30.8 | 4.1 | Slight slip detected |
| P3 | 97 | 110 | 31.2 | 4.0 | Consistent with spec |
Interpretation:
Results confirmed the polymer maintained mechanical integrity after machining and sterilization.
Action Taken:
We standardized the test protocol and used it for batch release certification.
How to Read a Stress-Strain Curve: My Go-To Checklist
When I review tensile test results, I always look for the following:
- Linear Elastic Region: Is the slope smooth? Jagged lines may mean sensor noise or grip slippage.
- Yield Point: Sharp vs gradual transition — this can differ by material and heat treatment.
- Strain Hardening: Seen as a rising curve after yield. Its absence in metals may indicate prior work hardening.
- Fracture Zone: Sudden drop. Compare fracture location with expected failure point.
- Elongation: Is it consistent with ductility expectations? Low elongation in ductile materials = red flag.
If anything feels “off,” it usually is. Don’t ignore your gut — dig deeper. I once caught a stress curve that dipped slightly before the ultimate strength peak. That led us to discover micro-voids from contaminated raw stock.
How to Use This Data Across Your Team
One of the best things we did was build a tensile test database across our CNC product lines. For every material, we collected:
- Raw bar properties
- Post-machining data
- Batch-specific notes
- Anomalies or failures
Over time, this gave us a baseline for what “normal” looks like — and we could instantly flag anything that deviated.
| Material | Expected Yield (MPa) | Expected UTS (MPa) | Flag if UTS < |
|---|---|---|---|
| 6061-T6 | 270–275 | 305–310 | 295 |
| 7075-T6 | 470–480 | 515–525 | 505 |
| PEEK | 95–100 | 110–115 | 105 |
| 304 SS | 210–230 | 510–540 | 500 |
Takeaways: Read More Than the Numbers
- Don’t just ask: “Did it pass?” Ask: “Is this what I expected?”
- Always compare across batches, materials, and suppliers.
- Use fracture surface analysis as a complement to numerical results.
- If something seems off — rerun the test. One extra hour now can save weeks of failure analysis later.
Role in Quality Assurance and Certification
One of the first things I learned when working on ISO 9001 documentation was this: if you can’t prove it, it didn’t happen. That principle applies directly to tensile test data. You can machine the perfect part, but without validated mechanical property records, you can’t sell it to many industries — especially aerospace, automotive, or medical.
In this section, I’ll break down how tensile testing fits into formal quality systems, supports compliance with international standards, and strengthens your manufacturing credibility.
Why QA Teams Should Care About Tensile Testing
When I meet with quality managers, I always explain that tensile tests aren’t just engineering exercises — they’re proof. They confirm that:
- Your raw materials meet specifications
- Your machining process hasn’t degraded strength
- Your product is safe to use
And in regulated industries, that proof is often legally required.
Linking Tensile Testing to Quality Standards
Here’s how tensile testing aligns with common certification frameworks:
| Standard | Relevant Clause/Requirement | How Tensile Testing Supports It |
|---|---|---|
| ISO 9001 | 8.5.1 — Production and service provision | Verifies product conformity against design requirements |
| AS9100 | 8.4 — Supplier verification | Ensures material property traceability in aerospace |
| IATF 16949 | 8.6.4 — Final product acceptance | Confirms mechanical performance for automotive parts |
| FDA QSR 820 | 820.30(f) — Design verification | For medical devices, shows that device meets specs |
| EN ISO 13485 | 7.3.6 — Design and development verification | For implants and surgical devices |
If you’re submitting a first article inspection (FAI) report, tensile test data is often part of the mechanical properties validation. Without it, the FAI gets rejected.
How We Integrate Tensile Tests into QA Workflows
At my company, we don’t treat tensile tests as a separate activity. Instead, we embed them into the production process.
Here’s a simplified workflow:
- Material Receiving
→ Get mill certs
→ Spot test samples from each batch - After CNC Machining (Critical Parts Only)
→ Extract sub-size samples from real parts
→ Run tensile test for verification - Before Shipment
→ Compare with baseline mechanical property table
→ Flag deviations for review - Audit Ready Reporting
→ Store test reports by part number and batch
→ Include stress-strain curve, fracture images, and calibration logs
This system has helped us pass every AS9100 audit for the past 4 years — and we’ve had zero mechanical property-related returns since.
Creating a Tensile Test Report That Stands Up to Audit
Auditors love structure. So we created a tensile report template with the following fields:
| Field | Example Entry |
|---|---|
| Part Number | CNC-BRKT-6061-A |
| Material Type | 6061-T6 Aluminum |
| Test Standard | ASTM E8 |
| Sample Orientation | Parallel to rolling direction |
| Load Cell ID | LC-5000-NB |
| Grips Used | Hydraulic, flat face, 30 mm jaw width |
| Elongation Measurement | Clip-on extensometer, 50 mm gauge length |
| Environment Conditions | 22°C, 45% RH |
| Yield Strength (MPa) | 270 |
| UTS (MPa) | 310 |
| Elongation (%) | 12.2 |
| Test Operator | Mark T. (QA Lead) |
| Machine Calibration Date | 2024-12-10 |
| Notes | Fracture occurred in gauge section, normal necking behavior |
That level of detail saves us from hours of back-and-forth with auditors and customers.
Using Tensile Test Data to Manage Supplier Quality
Tensile testing is also one of our best tools for supplier oversight.
We routinely test:
- Incoming raw bar stock
- Subcontracted machined parts
- Heat-treated components
Then we compare tensile results to spec ranges. If a vendor’s materials fall outside the range more than once, they go on a watch list.
This process helped us catch a batch of “6061-T6” aluminum that had yield strengths 20% lower than usual. Turns out it was improperly tempered — and the certs had been falsified.
Here’s a sample comparison:
| Supplier | Specified Yield (MPa) | Measured Yield (MPa) | Status |
|---|---|---|---|
| Vendor A | 270–275 | 273 | PASS |
| Vendor B | 270–275 | 258 | REJECTED |
| Vendor C | 270–275 | 265 | MONITOR |
This kind of hard data gives purchasing and QA teams a real-time view of material risk.
Customer Communication and Product Claims
Tensile test results also support marketing — especially when you’re selling into industries that prioritize safety and durability.
We’ve used tensile data in:
- Product datasheets
- Technical sales presentations
- Competitive comparisons
Instead of saying “our parts are strong,” we say “our CNC-machined 6061-T6 brackets consistently achieve a tensile strength of 310 MPa, exceeding ASTM minimums by 5%.”
That’s way more persuasive.
When to Re-Test: Establishing a Testing Schedule
One common question I hear is: “How often should we run tensile tests?” There’s no one-size-fits-all answer, but here’s our general guide:
| Scenario | Testing Frequency |
|---|---|
| New material supplier | Every batch for first 5 lots |
| Routine production (low risk parts) | 1 out of every 10 batches |
| Aerospace or medical parts | Every batch (mandatory) |
| Post-process sensitive (e.g. anodized) | Every lot |
| Customer complaint or quality issue | Immediate retest required |
Having a documented policy keeps everyone aligned — and helps defend decisions during audits.
Selecting Equipment, Labs, and Reporting Standards
If you’ve made it this far, you know the importance of tensile tests. But what if you’re ready to run your own tests and don’t know how to start? Or maybe you want to outsource the testing and aren’t sure what to look for in a lab?
This section is your guide.
Whether you’re setting up an in-house tensile test station or selecting a trusted lab partner, your decisions here will directly impact the quality and reliability of your data.
In-House vs. Third-Party Labs
Here’s how I usually frame it:
| Factor | In-House Testing | Third-Party Lab |
|---|---|---|
| Cost (long-term) | Lower per test, high setup cost | Pay per test, no capital investment |
| Turnaround time | Instant control | 3–7 days typical |
| Equipment maintenance | Your responsibility | Included in service |
| Audit readiness | You manage documentation | Labs provide standardized, auditable reports |
| Data confidentiality | Fully secured internally | Risk of external access |
| Expertise requirement | Need trained technicians | Access to certified professionals |
We opted for a hybrid model. Routine tests are done in-house; complex or high-risk ones go to certified labs.
What to Look for in a Testing Machine
There’s a dizzying number of options, but here’s what I recommend based on experience:
- Capacity: Match your materials — 5 kN for plastics, 50–100 kN for metals
- Speed range: 0.001–500 mm/min is ideal for flexible standards
- Grips: Interchangeable hydraulic or pneumatic grips are worth the cost
- Extensometer: Go digital or non-contact if budget allows
- Software: Must allow full stress-strain analysis + export to PDF/Excel
Brands we’ve had good results with include Instron, ZwickRoell, and Shimadzu. Buy from vendors who offer on-site calibration, or your audit prep will be a nightmare.
Questions to Ask a Third-Party Testing Lab
If you outsource tensile testing, you need to ask smart questions:
- What standards do you follow? (They should say ASTM E8, ISO 6892, etc.)
- Can you provide full test reports with graphs and photos?
- How often is your equipment calibrated?
- Do you have experience with [your material type]?
- What’s the turnaround time and cost per sample?
You should also request:
- A sample test report before you commit
- Their accreditation certificates (ISO 17025, Nadcap, etc.)
- NDA if your product design is confidential
I once worked with a lab that couldn’t explain what an extensometer was. Lesson learned — always vet your vendors.
Standardizing Your Reporting
If you’re building your internal test process or prepping for an audit, your reports need consistency.
Here’s a checklist we use for every tensile test file:
- Specimen ID and traceability
- Material spec and condition (e.g., “7075-T6, post-machined”)
- Sample orientation (with diagram if needed)
- Machine make/model and serial number
- Load cell ID and calibration date
- Environment conditions during test
- Test speed and strain rate
- Stress-strain curve
- Notes on fracture behavior
- Inspector name and signature
Even if you’re a small shop, this level of rigor builds client confidence — and makes passing certifications much easier.
Conclusion
When I first started in CNC manufacturing, tensile testing felt like a side topic. Something left to labs and engineers in white coats. But over time, I’ve seen it become a core part of how we design, validate, and build better products.
Tensile tests tell us:
- If the material we bought matches the spec
- If our machining process compromised the part
- If our supplier is trustworthy
- If our product can survive the stresses it will face
But more than that, tensile tests tell us the truth. Not what the CAD model says. Not what the supplier cert claims. What the material can really handle — here, now, post-machining.
I’ve worked with aerospace teams using tensile testing to certify $50,000 turbine parts. I’ve helped startups use basic tensile data to prove their product was safer than their competitors’. And I’ve seen testing save lives by catching bad batches before they reached customers.
So here’s my final advice:
- Invest in understanding tensile testing — it’s worth it.
- Treat it as part of your design loop, not just a final check.
- Use the data to drive better decisions, not just fill a folder.
If you machine it, test it. If you test it, read it. If you read it, use it.
That’s the mindset that will take you from reactive to proactive manufacturing — and from good to great in mechanical reliability.
FAQ
1. What is a tensile test, and why is it important?
A tensile test measures how a material behaves under tension — how much it can stretch, when it yields, and when it breaks. It’s crucial for verifying that materials used in CNC parts meet strength and safety requirements.
2. Does CNC machining affect tensile strength?
Yes. CNC machining can introduce residual stress, microcracks, and surface irregularities that may reduce tensile strength. Tensile tests help detect these changes before failures occur.
3. When should I perform a tensile test — before or after machining?
Both can be useful. Pre-machining tests validate raw material quality, while post-machining tensile tests confirm that the CNC process didn’t degrade the material’s mechanical properties.
4. What’s the difference between yield strength and tensile strength?
Yield strength is the point where permanent deformation starts. Ultimate tensile strength (UTS) is the maximum stress the material can withstand before breaking.
5. Which standards should I follow for tensile testing?
Common standards include ASTM E8 (metals), ISO 6892 (metals, international), ASTM D638 (plastics), and ISO 527 (polymers). Choose based on your industry and material.
6. Can tensile test results vary depending on the direction of the CNC cut?
Yes. Material grain direction and machining orientation can influence strength. Test specimens should match the stress direction of the final product when possible.
7. Is surface finish important in tensile tests?
Absolutely. Rough CNC surfaces can introduce premature crack initiation and alter stress distribution. A smoother finish often yields more reliable and higher test results.
8. How do I choose a good tensile testing lab?
Look for ISO 17025-accredited labs, ask for example reports, verify experience with your material type, and ensure they follow appropriate testing standards.
9. What’s a typical turnaround time for tensile test results?
In-house testing is immediate. Third-party labs usually need 3–7 business days, depending on workload and sample quantity.
10. Can I run tensile tests on small CNC parts?
Yes. Sub-size and miniature tensile specimens can be prepared using EDM or micro-machining. Specialized grips and extensometers are needed for accurate testing.
11. What equipment is required to run a tensile test?
You’ll need a universal testing machine, appropriate grips, a calibrated load cell, and a method to measure strain (extensometer or digital camera system).
12. What are acceptable values for tensile strength in common CNC materials?
Here are general guidelines:
| Material | Yield Strength (MPa) | UTS (MPa) |
|---|---|---|
| 6061-T6 | 270–275 | 305–310 |
| 7075-T6 | 470–480 | 515–525 |
| 304 Stainless | 210–230 | 510–540 |
| PEEK | 95–100 | 110–115 |
13. How often should tensile tests be done in production?
It depends on risk level. For aerospace or medical, every batch. For low-risk consumer parts, every 5–10 batches or on supplier change.
14. Can tensile testing detect internal defects?
Sometimes. A sharp drop in strength or unusual fracture surfaces may indicate porosity, improper heat treatment, or internal damage. For deeper inspection, use X-ray or ultrasonic testing alongside tensile testing.
15. Is tensile testing destructive? Can I test parts without damaging them?
Tensile testing is inherently destructive. However, non-destructive alternatives (e.g., hardness, ultrasound) can estimate strength but aren’t substitutes for full tensile testing where certification is required.
16. How do tensile test results support ISO or AS audits?
Tensile test reports provide objective evidence of material and process compliance. Most auditors require traceable mechanical property verification for regulated products.
17. Can tensile testing help me evaluate my supplier’s materials?
Yes. Regular tensile testing helps identify out-of-spec materials early and ensures that supplier-provided material certs are accurate.
18. What does a complete tensile test report include?
A complete report should have sample specs, test setup details, load vs. elongation data, stress-strain curves, fracture analysis, machine calibration logs, and operator information.
Further Reading and Authoritative References
To deepen your understanding of tensile testing and its application in CNC-machined parts, consider exploring the following reputable sources:
- Tensile Testing – Wikipedia
A comprehensive overview of tensile testing, including its purpose, methodology, and significance in materials science.
🔗 https://en.wikipedia.org/wiki/Tensile_testing - ASTM E8 / E8M – Standard Test Methods for Tension Testing of Metallic Materials
This standard outlines the procedures for uniaxial tensile testing of metallic materials at room temperature, detailing specimen preparation, testing methods, and data interpretation.
🔗 https://www.astm.org/e0008_e0008m-22.html - ISO 6892-1:2019 – Metallic Materials – Tensile Testing – Part 1: Method of Test at Room Temperature
An international standard specifying the method for tensile testing of metallic materials, defining mechanical properties determined at room temperature.
🔗 https://www.iso.org/standard/75177.html - Stress–Strain Curve – Wikipedia
An explanation of the stress–strain relationship in materials, illustrating how materials deform under stress and the significance of various points on the curve.
🔗 https://en.wikipedia.org/wiki/Stress%E2%80%93strain_curve - Universal Testing Machine – Wikipedia
Details the equipment used for material testing, including tensile tests, and explains the functionalities and types of universal testing machines.
🔗 https://en.wikipedia.org/wiki/Universal_testing_machine - ISO 6892-1: Understanding the Standard for Tensile Testing – ZwickRoell
An in-depth look at the ISO 6892-1 standard, discussing its applications, testing procedures, and the importance of standardized tensile testing methods.
🔗 https://www.zwickroell.com/industries/metals/metals-standards/tensile-test-iso-6892-1/
These resources provide valuable insights and detailed information on tensile testing standards, methodologies, and equipment, supporting a deeper comprehension of the subject matter discussed in this article.
Other Articles You Might Enjoy
- Tensile Strength of Steel Explained for Engineers and Machinist
Introduction The tensile strength of steel is the heartbeat of engineering and machining. It’s the maximum stress a steel part can endure before snapping, and it’s a make-or-break factor for…
- Yield Strength vs Tensile Strength: CNC Material Choice and Process Optimization
I. Introduction 1. Definition of Yield Strength and Tensile Strength I remember the first time I encountered the terms yield strength and tensile strength in my early machining projects. Yield strength refers to the…
- How Does Tensile Stress Affect CNC Machining Processes
Tensile stress is a fundamental concept in material science that has far-reaching implications in CNC machining processes. Understanding how tensile stress interacts with various materials can greatly impact the effectiveness…
- The Ultimate Guide to Stress Relieving for CNC Parts: When, Why, and How
Introduction Stress relieving has always been a point of fascination for me. I remember the first time I discovered how much of a difference it makes in CNC machined parts.…
- The Role of the Shear Stress Equation in CNC Process Optimization
A Personal Approach to CNC Process Optimization As someone who’s spent years working in the CNC machining field, I've come to realize that understanding the Shear Stress Equation is not…
- Understanding the Stress Strain Curve for CNC Material Selection
The Importance of the Stress-Strain Curve in CNC Machining In the world of CNC machining, understanding the stress-strain curve isn't just a technical necessity—it's a strategic advantage. When I first…
- Why Shear Strain Matters in CNC Machining
The Importance of Shear Strain in CNC Machining Understanding shear strain is essential not only for selecting the right materials but also for optimizing machining processes in CNC applications.but also…
- What Is NDT? Complete Guide to Non-Destructive Testing Methods And Use Cases
Chapter I: Introduction to NDT Non-Destructive Testing, or NDT, plays a huge role in modern engineering.I remember the first time I encountered NDT was during a site visit to a…
- Understanding Direct and Indirect Measurement Techniques for CNC Machined Parts
When it comes to CNC machining parts, quality control is key to ensuring everything fits together perfectly. In the quality inspection process of CNC parts, measurement is the foundation of…